• Skip to primary navigation
  • Skip to main content
  • Skip to primary sidebar

BladeReviews.com

Knife Reviews

Menu
  • Home
  • Reviews by Brand
    • Al Mar Knives
    • Benchmade Knives
    • Boker Knives
    • Buck Knives
    • Cold Steel Knives
    • Chris Reeve Knives
    • CRKT Knives
    • DPx Gear
    • Emerson Knives
    • ESEE Knives
    • Fällkniven Knives
    • Fantoni Knives
    • Gerber Knives
    • Great Eastern Cutlery
    • Hinderer Knives
    • Hogue Knives
    • Ka-Bar Knives
    • Kershaw Knives
    • Kizer Knives
    • LionSteel Knives
    • Mcusta Knives
    • Mora Knives of Sweden
    • Microtech Knives
    • Ontario Knives
    • Opinel Knives
    • Reate Knives
    • Rockstead Knives
    • Schrade Knives
    • Shirogorov Knives
    • Smith & Wesson Knives
    • SOG Knives
    • Spartan Blades
    • Spyderco Knives
    • Steel Will Knives
    • Strider Knives
    • Victorinox Knives
    • Viper Knives
    • Zero Tolerance Knives
    • Close
  • Reviews by Purpose
    • EDC Knife Reviews
    • Tactical Knife Reviews
    • Survival Knife Reviews
    • Hard Use Folding Knives
    • High End Pocket Knives
    • Gentleman’s Folders
    • Rescue Knives
    • Traditional Knives
    • USA Made EDC Knives
    • Close
  • Reviews by Class
    • Folding Knives
    • Fixed Blade Knives
    • Assisted Opening Knives
    • Automatic Knives
    • Machetes
    • Titanium Frame Lock Knives
    • Close
  • Best Of
    • The Best EDC Knives
    • Best Survival Knives
    • Best Tactical Knives
    • Best High Value Knives
    • Close
  • Gear Reviews
    • Flashlight Reviews
    • Multi-Tool Reviews
    • Watch Reviews
    • Knife Sharpener Reviews
    • Close
  • FAQs
    • Knife Care and Maintenance
    • Knife Dictionary
    • Knife Steels
    • Steel Composition
    • Interviews
    • Close
  • Contact
  • About
    • About
    • Privacy
    • Links
    • Close

Misc. Gear

Gerber Downrange Tomahawk Review

by Chad McBroom 4 Comments

The tomahawk is a North American hand-axe first used by the Algonquian Indians. Originally made from stone, the introduction of metal blades came with the arrival of the Europeans to North America. The tomahawk remains one of the most versatile bladed tools in existence. Modern uses of the hawk include breaching, rescue, survival, and close-quarter combat.

Gerber Downrange Tomahawk with Sheath
Buy the Gerber Tomahawk at BladeHQ

Buy on Amazon

The tomahawk has seen a huge surge in popularity over recent years. The Gerber Downrange Tomahawk is just one example of the modernization of this classic weapon and tool.

Purpose

From the moment you lay your eyes on it, it is evident that the Gerber Downrange Tomahawk has one purpose, and one purpose only—destruction! Sure, you can take this tool camping and use it to chop fire wood and drive tent stakes, but it would be like using a tank to drive your date to the prom. This tool is made for breaching—designed to remove unwanted doors form walls and unwanted walls from doors.

General Dimensions and Blade Details

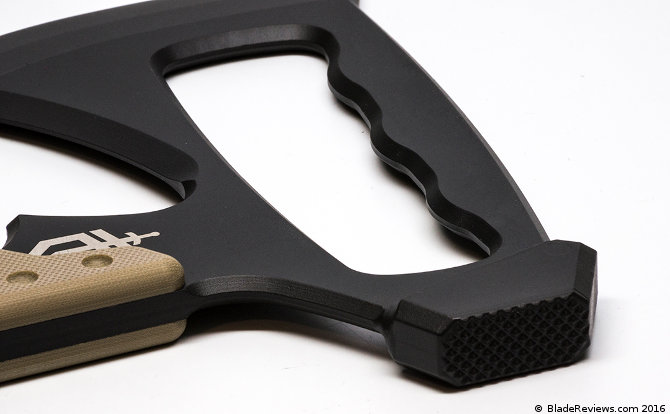
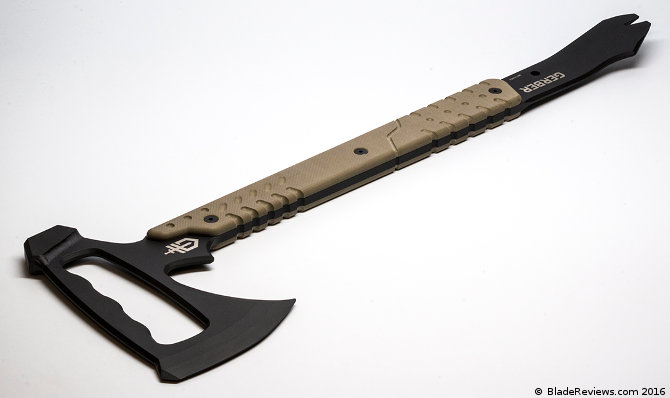
The Downrange Tomahawk (DRT) has a three-purpose axe head designed to pack the most function into this breaching tool: A beveled edge for chopping through drywall, doors, vehicle skins, rope, etc.; a hammer head for busting locks, doorknobs, hinges, and the like; and a cutaway grip for controlling the pry bar end. Measuring at 19.27 inches, the Downrange Tomahawk is one of the larger “tactical” tomahawks on the market. While this makes it a little more cumbersome to pack around, it definitely adds to its leveraging capabilities when used as a pry bar.

Gerber Downrange Tomahawk Head

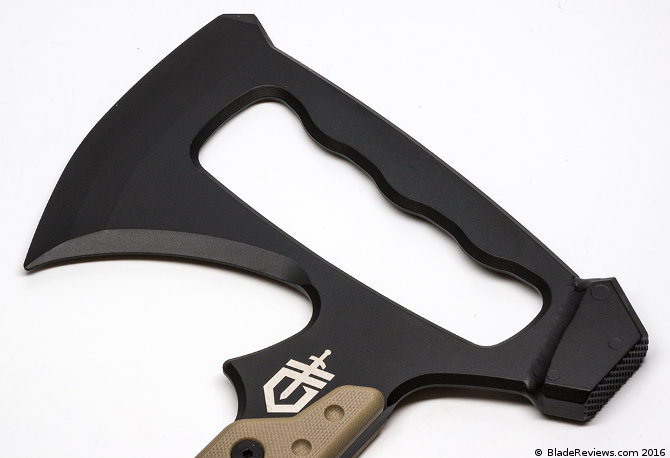
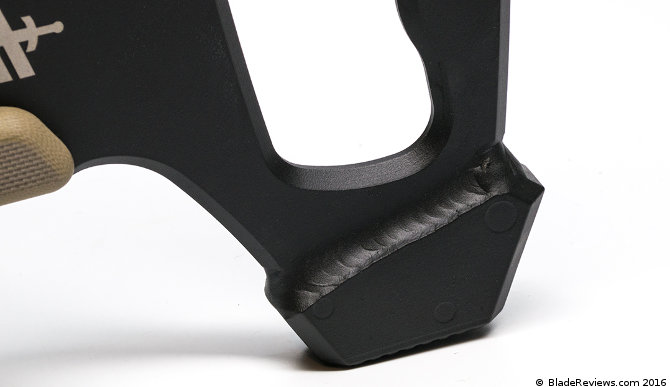
With the exception of the welded on hammer head, the DRT is made from a solid piece of 420HC steel and finished with a black Cerakote™ coating. A sweeping beard that comes to a point at the heel gives this hawk excellent hooking capabilities, which can be used for ripping out the busted shards of its target, or for hooking onto stumps and logs when climbing up difficult terrain.

Gerber Downrange Tomahawk Head Detail

One of the major complaints that I have heard voiced by customers is the DRT’s lack of a sharpened edge. This usually comes from those who fail to understand the intent of this breaching tomahawk. A sharpened bevel is great for chopping wood and other cutting tasks; however, when it comes to breaching a door or cutting through the skin of a downed UH-60 Black Hawk helicopter, a sharpened bevel tends to over penetrate and get stuck, making the task more difficult. Gerber’s thought process then, was that their tomahawk could easily be sharpened for survival and bushcraft use, but with breaching and rescue being the primary focus of this design, a less aggressive bevel was ideal.

Handle and Ergonomics

The DRT has integrated tan G10 handle scales that contour with the jimping on the upper and lower portions of the handle. The bottom portion of the handle has jimping on both the front and back, whereas the top portion of the handle has jimping only on the front. The aggressive jimping makes for a very secure grip, especially when wearing gloves. The location of the jimping on the bottom portion of the handle is in the perfect location for gripping the tomahawk for maximum chopping leverage.

Gerber Downrange Tomahawk

As mentioned earlier, the head doubles as a handle for the pry bar via a cutaway in the center. The addition of four finger groves creates a nice home for your hand inside the handle. There is also a small guard where the head and the handle meet. This guard protects your hand from getting smashed when you are choking up on the hawk.
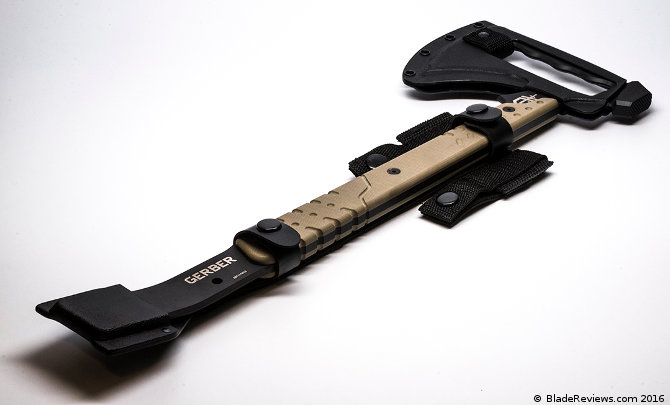
Sheath

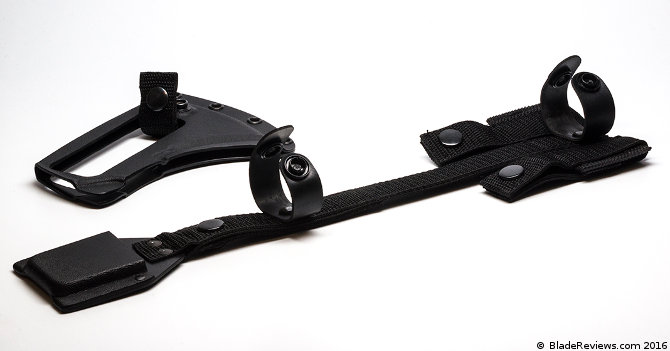
A tool like the DRT is rendered useless if it is not accessible when you need it. The best breaching tool in the world won’t open a single door if it is sitting back in vehicle you drove to the objective. The DRT is made packable through a MOLLE-compatible sheath system that incorporates a molded pry bar sleeve attached to nylon webbing. Two snapping retention bands secure the tomahawk in place. Two side-by-side MOLLE attachments at the top and a centered MOLLE attachment at the bottom of the webbing can be used to attach the DRT to a pack, standard webbing, or body armor so that the DRT goes where you go.

Gerber Downrange Tomahawk Sheath

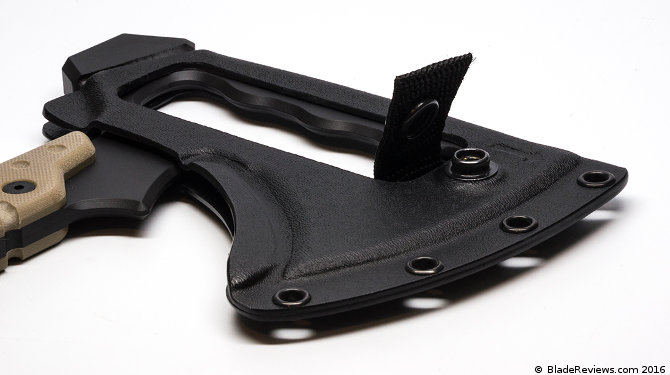
There is a separate portion of the sheath system that covers the tomahawk’s head. The head cover slides over the head and secures in place with a snapping nylon strap. This cover leaves the hammer head and the cutaway handle exposed so the pry bar and hammer can be used with the head cover in place. This reduces deployment time by eliminating the need to remove the cover unnecessarily, while acting as a safety measure to keep the edge covered during prying.

Gerber Downrange Tomahawk Sheath System

Testing

I took the DRT out to a building that was scheduled for demo and put it through the paces. Doors, drywall, and sheet metal were no match for the DRT. I was able to turn an interior door into splinters within a matter of seconds and the bevel worked like a can opener on the sheet metal. The pry bar also worked like a charm for separating doors from their frames. Using the hammer head, I was able to remove door knobs and hinges with a few whacks. Cinder block also proved to be of little consequence when it came to stopping the DRT.

Gerber Downrange Tomahawk Crusher

Gerber Downrange Tomahawk Review – Final Thoughts

The Gerber Downrange Tomahawk is an extremely versatile breaching tool that performs as advertised. I was actually a bit surprised by its performance. I am a bit of a steel snob and 420HC is not one of my favorite steels. While 420HC is on the higher end of the 400-grade stainless steels, it is a low-grade blade steel generally speaking. I have learned, though, that I am often surprised by the performance of some of these lower grade steels when they are properly hardened. I have not tried putting an edge on the DRT, so I do not know how well this 420HC hawk will retain an edge, but as it is out of the box, it performed well.

Compared with offerings from boutique brands like Hardcore Hardware, RMJ Tactical, and Dawson knives, the DRT is priced appropriately at under $200 retail. I definitely recommend the Gerber Downrange Tomahawk for anyone looking for an effective breaching/rescue tomahawk.

Gerber Gear Downrange Tactical Tomahawk Survival Multitool, Camping Axe with Hammer Head and Steel Pry Bar, Includes Sheath with Integrated Molle Straps
  • DURABLE CAMPING GEAR: Features a multi-purpose breaching tool, with axe head with beveled edge, hammer head, and integrated pry bar for ultimate control in tactical situations
  • INNOVATIVE DESIGN: USA-made from 420HC steel with a corrosion-resistant Cerakote finish, ensuring this survival tool won't bend or break under pressure
  • VERSATILE OUTDOOR ACCESSORY: Combines the functionality of a tactical tomahawk, hammer, and pry bar in one compact multi-tool, perfect for various tactical and survival scenarios
  • COMPACT AND CONVENIENT: Includes a low-profile MOLLE-compatible sheath for easy attachment to your pack, standard webbing, or body armor, great portable tactical gear
  • OUTDOOR ESSENTIALS: Ideal for hunters, soldiers, tradesmen, and outdoor enthusiasts; a crucial addition to any tactical load-out or essential survival kit equipment; Backed by the Gerber Guarantee, a limited lifetime warranty
$249.99 Amazon Prime
Buy on Amazon

I recommend purchasing the Gerber Downrange Tomahawk at Amazon or BladeHQ.

Filed Under: Folding Knives, Gerber, Knives By Purpose, Made in the USA, Misc. Gear, Multi-Tools Tagged With: 420HC, Made in the USA

Foursevens Preon 2 Review

by Benjamin Schwartz 7 Comments

Last Updated: September 7, 2019
I chose the Streamlight Microstream for my first flashlight review because I felt like it would establish a good ‘control’ for whatever I decided to review next. It was simple, straightforward, unadorned: an appealingly plain little light.

Foursevens Preon 2 Review

Buy on Amazon

But I also chose it because it wasn’t an enthusiast product, in the sense that something like the Prometheus QR and the Peak Eiger are enthusiast products. These are designed for people who want to read the spec sheets, who know the names, pros, and cons of different emitters like knife guys know the quirks of different steels. In the gear world, there tends to be a pretty clear distinction between what’s made for the enthusiast, and what’s made for the everyman.

Which is a regrettable state of affairs, because I think that each side has a lot to learn from the other: non-enthusiast companies can learn about the importance of smart, purposeful design choices, and the enthusiast companies can learn about value and respecting the user’s investment in concrete ways.

There are a handful of pieces of gear that I feel represent this comingling of enthusiast and everyman sensibilities: crossover designs, if you will. In the knife world, the Kershaw Leek is the premier crossover design. In the world of flashlights, we have the 47s Preon 2. This is a light designed by enthusiasts, but seemingly geared towards an everyman user. As such it seems like a logical next step after the Microstream. The question is, is it a step worth taking?

General Dimension and Construction

The Preon 2 is in a different size class than the Microstream. It is almost exactly 5” long, and about 1/2” across at its widest point. With batteries in, it weighs 1.8 oz. with the batteries in. It’s a 2xAAA light.

Foursevens Preon 2 Emitter

The Preon 2 is a pen light. The pen light is a proven, recognizable shape. People like it. I can see the appeal, but find it less appealing than the compact, 1xAAA format of the Microstream – or, for that matter, the Preon 1. As a gear enthusiast, I carry a lot of stuff in my pockets: a knife, a pen, a flashlight, a phone, maybe a notebook. If all I carried was a flashlight, I wouldn’t really care. But because I carry it along with so much else, I notice the size and do not appreciate it – and, as we’ll discuss below, the extra length doesn’t really offer any particular performance benefits.

Foursevens Preon 2 Disassembled

The Preon 2 is made of type-III hard anodized aluminum. Not particularly original, but everything is put together tightly and well. This is Dan’s personal Preon 2. He’s had it for a while, and while there is some wear around the bevel and the clip, I feel safe saying that the anodization seems to be holding up better than the quickly-flaky job on my Microstream. The batteries rattle a little in the body tube but other than that the fit and finish is above-average.

Foursevens Preon 2 Pocket Clip

The Preon 2’s washer-style clip is good. Not great: to my eye it looks a little goofy and it’s definitely too short for the length of the light. It does seem a little thin, and I would worry about bending it out of shape over time, but that’s all theorizing: in the moment, it is adequate if not excellent.

Output, Runtime, and UI

Here’s where the Preon 2 reveals its enthusiast design elements, with much higher outputs, way better runtimes, and a much more cerebral UI than the, er, streamlined Microstream.

Foursevens Preon 2 in Hand

The Preon 2 is a clicky, my favorite UI by a country mile. It has three basic modes: a moonlight low at 2 lumens, a medium of 22 lumens, and a high of 160 lumens, accessed in that order. It runs at moonlight for 23 hours, 6 hours at medium, and .8 hours at high. My review sample is a first generation model. The second generation has a different emitter and higher outputs. There is a third generation out now that makes more significant changes, but I’ll discuss that below.

Let’s talk about the good stuff first: I like the output options a lot. 47s made a name for itself with its moonlight lows: they give you enough light to navigate, say, a dark room, but won’t affect your night vision. This is my first experience with a 47s product and that low low is really nice to have. The medium and high are nice too. For close- and medium-range tasks there isn’t much difference between them, but I could see the high being useful over long distances or outdoors. The beam pattern is also significantly better than the Microstream’s: less artifacting, a cleaner, even color – a different league altogether.

Where the Preon 2 loses points with me, is in the execution of the hidden modes: strobe, SOS, High Beacon and Low Beacon. Basically, you cycle through the regular modes twice within three seconds, and that shunts you into the first of the four hidden modes. You then proceed through the four hidden modes as you would the three standard ones, before being shunted back into the regular configuration.

Foursevens Preon 2 vs. Spyderco Delica

For some reason, I found it easy to accidentally flip into the hidden modes when I didn’t want to; it occurred multiple times during regular use of the flashlight. I guess it isn’t a big deal, and generally options are good, but in this case I’d simply prefer not to have them. It reminded me of one of those pens you see with like three different colors of ink and a pencil tip all in one barrel: it’s just an level of geekery I’m not interested in in my tools, and it adds fiddliness to something that should be intuitive in its simple role.

Ergonomics and Carry

The Preon 2 is comfortable in hand. Not too thin, not too thick, the clip doesn’t get in the way – all good news. It is, however, slick. Really slick. Like, there are very few knives or flashlights that I worry will slip out of my hands, but the Preon 2 is one of them. Everything is smooth; even the angles near the emitter and the clicky are soft, offering no purchase. If the anodizing was just a little rougher, like what we have on the Microstream, the problem would be fixed.

Foursevens Preon 2 in Hand

I’ve already discussed the issues I have with the pen light form factor in general, but here I’ll add that the slickness of the Preon 2, combined with the shortness of the clip, cause it to slide around a lot in my pocket, which I don’t appreciate. Is this, in the grand scheme of things, a big deal? Of course not. But over time these little issues build up and cohere into something more irritating than its constituent parts. Particularly when you consider how right the Microstream got its carry, it’s hard not to feel a little disappointed here.

Foursevens Preon 2 vs. Streamlight Microstream

Preon 2 Review – Final Thoughts

I find the Preon 2, with its enthusiast design cues and everyman price and purpose, to be an interesting light. You get a good selection of outputs, a big boy emitter, and even some geeky hidden mode stuff all for about $40 – more than twice the price of the Microstream, it’s true, but still not exorbitant.

As it stands, though, the myriad little issues I have with the Preon 2 add up, and I don’t think I would recommend it over the Microstream for most purposes. The low and high modes are awesome but not strictly necessary, and the ergonomics are objectively worse. There’s a lot to like about the Preon 2, but they don’t add up to something I like more than other, cheaper everyman options, or slightly-pricier enthusiast offerings.

But here’s the thing: the Preon 2 I reviewed was the first generation. Big changes came with the newest Preon: even better outputs, with an option to configure it in such a way as to hide the hidden modes, a way better clip, and a textured body to help with grip – these changes address every issue I had with the Preon 2 apart from its pen light size, which I’m not penalizing it for unconditionally because that is a personal preference (and the Preon 1 exists for those who want the 1xAAA format). This new Preon 2 goes for $50 and looks pretty great. I haven’t handled one so I can’t say it’s worth it for sure but, if you’re interested in this light, this is the version to get.

Foursevens Preon P2 MKIII LED Flashlight, Mini Pocket EDC Flashlight with Clip, High CRI, Multiple Configurable Modes Including Strobe & Beacon (Black Anodized)
  • SUPERIOR LIGHT QUALITY. See colors as you would on a bright sunny day. Cheap LED flashlights have a limited color spectrum that washes out your subject with a harsh "hospital" light. The Black Preon P2 LED flashlight delivers a high 92+ CRI - a clear, natural light.
  • SECURE ERGONOMIC CLIP. The Black Preon P2 EDC LED flashlight uses the legendary stainless steel Prometheus Lights pocket clip. It is engineered to hold tight to your pocket and last through bumps and drops. Won't rust or corrode. Designed for style, built for durability.
  • MULTIPLE CONFIGURABLE MODES. Configure your pocket flashlight to serve you best. Choose from 6 various lighting functions: Low - Med - High - Strobe - SOS - Beacon. Also features Mode Memory.
  • MINI EDC LED FLASHLIGHT. Lightweight and fits in the palm of your hand. Keep this powerful flashlight in your pocket as an every day carry. It doesn't add bulk and weight to your pocket and leaves room for your keys.
  • PROFESSIONAL GRADE. Precision engineered mil-spec components that are fit for medical and aerospace applications. Built to last and designed to be your EDC LED flashlight. For those who insist on uncompromising quality.
Buy on Amazon

You can get the second and third generations of the Preon 2 through Amazon.com. Thanks for reading.

Editor’s Note: As Ben mentioned, this is my personal Preon 2. I have carried it for years now and greatly enjoy this flashlight. A couple years ago I swapped the Preon 2 out for an even smaller light (the Foursevens Mini ML), but the light was so small I ended up misplacing it and going back the P2. So while I may prefer a smaller light, there is something to be said for this form factor.

Filed Under: Flashlight Reviews, Misc. Gear Tagged With: 2xAAA, clicky

Seiko SKX173 Dive Watch Review

by Dan Jackson 18 Comments

I am going to attempt something different here and write a series of reviews on watches. Being that this is the first watch review in the series, I figured that I might as well start at the beginning – at least in terms of my personal journey with watches. I won’t pretend to be an expert on the subject. You likely wont find much technical detail here, or mention of the word “horology”… who knows, maybe I will get there eventually.

Seiko SKX173

No products found.

So lets begin at the beginning: My dad has owned a Rolex Submariner for as long as I can remember. He told me his one big regret about the watch was not buying it sooner. With that kind of paternal influence it wasn’t long before I began pining for a dive watch of my own. The problem was that I was starting grad school at the time. To say I didn’t have much money was an understatement. I financed my graduate education on student loans and summer jobs, so I don’t know what the hell I was thinking wanting to buy a watch. I certainly didn’t have the money for a Submariner.

But I was still drawn to dive watches, and I wanted something that had an automatic movement and some history to it. In doing my homework I stumbled across the humble Seiko SKX173. Most are more familiar with it’s brother, the SKX007. At any rate, much like Rolex, Seiko has its own rich history of making dive watches. Plus, the SXK173 could be acquired for around $200. It was still $200 that I didn’t have at the time, but before I knew it the watch was at my doorstep.

Intended Use and Background Info

This is supposed to be about the watch and not about me, but I also think it’s important to caveat the review and provide some perspective to the reader. I’m not a diver and don’t play one on the internet. I just happen to like dive watches. They have a lot of versatility. If you wear a sleek diver on a bracelet it looks good whether you are wearing jeans or a suit. On a rubber strap, the watch takes on a more casual look. Theoretically you could have a nice diver be your one watch.

I wore my SKX173 religiously for 2 years. That is, until, I broke it. I was digging a ditch in my back yard. It was hot, and I don’t remember what exactly was going on, but when I looked down at my wrist I recall the time being off – completely off. All the shock must have broken the movement. Years later I sent the 173 in to Seiko and they fixed it for around $100.

I still have the watch and wear it occasionally. It is pretty beaten up. I lifted weights with it, swam with it, drank unhealthy quantities of beer with it, and generally thrashed around with it for a couple years. At this point the watch has been scuffed, scratched, dented, and dinged. Although I never explored a shipwreck with it, I certainly did not baby my SKX173.

Case and Movement

The SKX173 has 41mm case, is 13.5mm thick, has a lug to lung length of 46mm, weighs about 2.8 ounces (just the head – no bracelet), and is made in Malaysia. It is on the larger side, even for a diver. I think it looks good on my ~7″ wrist. It’s not comically large, although it certainly has some presence. The case is stainless steel. The sides and back of the case are polished, while the face has a brushed satin finish. The edges are beveled, providing a neat transition between the finishes.

Seiko SKX173 Crown

The the screw down crown sits at 4 o’clock, and is protected by a molded crown guard. The 4 o’clock crown is a signature Seiko look, and also serves the function of not poking the back of your hand as easily as a 3 o’clock crown. The screw in case back is solid steel, and has a wave logo on it. Some have remarked that this is a homage to Katsushika Hokusai’s “The Great Wave off Kanagawa” woodblock print, but who really knows for sure. All I know is that between the screw down crown and the screw in case back, this watch is rated for 200M of water resistance. I haven’t taken mine below 10 feet.

Seiko SKX173 Case

Seiko selected a Caliber 7S26 movement for the 173. This is a popular automatic Japanese movement found on many Seiko divers. I am not going to sit here and pretend that I know much about the 7S26, or watch movements in general for that matter. All I know is that my 173 kept decent time. I usually had to adjust it every month or so. Here is a link to a great article on the 7S26 movement for those who want to learn more about it.

Dial and Bezel

The dial of the SKX173 features rectangular raised hour markers, and a triangle at 12 o’clock. I greatly prefer this look over the round markers on the 007. I also like the way the dial is laid out. It’s simple, but there are still details to enjoy. I also like how there is not a lot of writing on the dial. “SEIKO AUTOMATIC” and “DIVER’S 200M” in red is all that adorns the face.

Seiko SKX173 Dial

The 173 includes a day/date feature (or a day/date “complication” in watch parlance). For me, the date is a must have on a watch, and is something I rely on all the time. I could live without having the day of the week on the dial as it’s one more thing to deal with, and as a working stiff I am already finely attuned to what day of the week it is.

The hands are angular and luminous, and suit the look of the dial. The tip of the second hand is also given some luminous paint (or “lume”). Speaking of lume, the stuff Seiko puts on their divers is the stuff of legend, and this 173 is no different. It is very bright, and holds a charge long into the night.

Seiko SKX173 on the Wrist

Rounding things out is a Hardlex crystal. Hardlex is not as scratch resistant as sapphire, but is better than a mineral crystal. Mine has held up pretty well over the years. It has picked up a few fine scratches (the kind you can only see if you look for them in the right light). No chips or cracks, although I am sure if you drop the watch on concrete bad things will happen.

Since this is a purpose built diver, the 173 comes equipped with a 120 click unidirectional bezel. The bezel takes some effort to manipulate, and is not something that will easily be brushed aside. I like the action of this bezel. Many an hour was spent absentmindedly manipulating it. The bezel is also functional. I end up using the bezels on my divers for timing everything from steaks on the grill, to billable hours at the office.

Bracelet and On the Wrist

My SKX173 came with a jubilee style stainless steel bracelet. It had hollow end links, a feature I quickly discovered that I did not like. The hollow links felt cheap in comparison to the rest of the watch, and did not follow the lines of the case. I quickly swapped the bracelet out for a Seiko rubber strap, and haven’t looked back (I don’t even know where the bracelet is at this point – hence pics of the strap only). The SKX accepts a 22mm strap or bracelet, and there is a ton of OEM and aftermarket options out there. I found that my strap fell apart after a year or so, but for $20 they are easy enough to replace (although I scratched the hell out of the back of the case in the process – if you aren’t patient, this is best left to the experts).

Seiko SKX173 Strap

I like the way the 173 wears, but wish it was a little thinner. At 13.5mm, it doesn’t hide underneath a shirt cuff easily, and the prominent bezel catches your cuff easily. As a student it was a fun and distinctive watch, and a nice casual look with shorts and a polo shirt. Now that I am working in an office, it is less appropriate. But the 173 is still great for evenings and weekends, and with a bracelet you could wear it with a dress shirt if you want to. It has some weight to it, but nothing out of the ordinary for a thick chunk of stainless steel.

Seiko SKX173 Pocket Dump

My Seiko SKX173 paired with a Cold Steel American Lawman and Foursevens AA2 flashlight.

Seiko SKX173 Review – Final Thoughts

Looking back, I am glad I bought my SKX173 – even if I really couldn’t afford it at the time. It scratched my itch for a fancy automatic diver for quite a few years, and I made some good memories wearing that watch. I have put the 173 through its paces, and it has more or less stood the test of time. Just don’t dig any ditches with it and you should be fine.

What I like about the SKX173 is that you get an attractive automatic watch with a real dive pedigree to it, and you can get it for around $200. I wasn’t ready to buy a Rolex, but I didn’t want something that was trying to be a Rolex either (there are a ton of cheap Submariner “homages” out there for those wanting that look). I wanted something that could stand on its own, with its own history and it’s own traditions. There aren’t a lot of sub $1000 watches that can do that, let alone a sub $250 watch. I think I made a great choice with the SKX173.

If your budget is especially tight, you can find a SKX007 for around $150. At that price I think you will be hard pressed to find a more serviceable automatic dive watch.

SEIKO Men's Automatic Analogue Watch with Rubber Strap SKX007K
  • Quality Japanese Automatic movement; Functions without a battery; Powers automatically with the movement of your arm
  • Hardlex crystal
  • Case diameter: 42 mm
  • Stainless-steel case; Black dial; Date-and-day functions
  • Water resistant to 660 feet (200 M): suitable for recreational scuba diving
Buy on Amazon

I recommend purchasing the Seiko SKX173 at Amazon.com. Please consider that buying anything through any of the links on this website helps support BladeReviews.com, and keeps the site going. As always, any and all support is greatly appreciated. Thank you very much.

Filed Under: Misc. Gear, Watch Reviews Tagged With: Made in Malaysia

Streamlight Microstream Review

by Benjamin Schwartz 14 Comments

Last Updated: August 3, 2019
It’s been my experience that the deeper my understanding of something goes, the less things of that something I like. To use my perennial dead horse as an example, years ago when I first started carrying and using knives, I thought the Delica was wonderful. However, over time as I filled my head with more and more minutiae about knives, and as my opinions about design and use became more developed, the Delica fell further and further in my esteem. As our taste gets better, it gets more and more specific (non-enthusiasts call this phenomenon ‘snobbery’).

Streamlight Microstream Review

Buy on Amazon

I’ve always considered myself a passionate layman when it comes to flashlights. They’re a very useful part of an EDC setup, something that I don’t like to go without, but my taste in flashlights hasn’t reached the rarefied air that my knife-sense has. Whereas with knives I’ve gone from “Does it cut?” to “Does it cut well?,” when I’m looking at flashlights I’m still just asking “Does it light up?”

So you’ll have to take my recommendation of the Streamlight Microstream with the proverbial grain of salt. And I do recommend it. Although it has been around for years with little real evolution, and although even a mediocre enthusiast flashlight smokes it in most categories, for what it is – and, to be fair, for what it costs – the Microstream is a perfectly adequate and charming little light.

General Dimensions and Construction

Whatever its other faults, the Microstream is just about the ideal size, for me, for EDC. It’s about 3 7/16” long, and, at its widest point, is about half an inch across. Streamlight lists the weight with battery as 1.04 oz., although by my scale I was getting 1.3 oz. or so – not a world-shattering difference by any means. It takes one AAA battery.

The Microstream has a by-the-books Type II anodization job. It looks clean and consistent out of the box, but in the testing period for my Microstream it started to show wear quickly. Nothing egregious, just a scratch here and there, but quicker than my Peak Eiger began to show wear.

Streamlight Microstream Pocket Clip

Less conventional is the Microstream’s clip. First, it is a friction-fit clip. Folks tend not to like friction-fit clips because they can get loose or knocked off during carry. I can tell you that the clip on my Microstream is extremely snug – so snug, in fact, that for a long time I thought it was actually part of the body and just looked like a friction-fit clip. The clip itself is made of a fairly thin leaf of spring steel, folded twice over to create an S shape, so that you can clip it either to your pocket as you would a knife, or to the brim of a hat or something for hands-free operation. I’ve never used this feature, but it is unobtrusive, and I like to think that extra fold of steel gives the clip some added durability.

Beyond these specifics, the fit and finish of the Microstream is more than adequate: the emitter is centered, the lens is free from blemishes, and the threads come apart and together without any dramatics.

Output, Runtime, and UI

It is in the fields of output and runtime that we really see the difference between the Microstream and current, higher-priced enthusiast products.

The Microstream has an out-the-front output of 28 lumens. The Foursevens Preon 2 can throw out 84, the Olight i3 gives you 80, the L3 Illumination L10C; the recently-released Olight S1 Baton goes all the way up to 500 lumens.

Streamlight Microstream Reflector

The Microstream is totally obliterated by its competition in terms of output, but beyond that it also doesn’t have different modes like most lights today: it’s either on at 28 or it’s off. Runtime is equally underwhelming at 2.25 hours. This wasn’t blowing wind up anybody’s skirt five years ago, and time has only increased the gap between the Microstream and its competition.

I’m going to say something, and I’m going to risk sounding reductive when I say it, but: 28 lumens is plenty good enough for most EDC situations, isn’t it? This is my dog-walking flashlight, as well as what I use when something rolls under the bed or a chair, and in these roles I get all the light I need – and I’ll go so far as to say that, for being only 28 lumens, it is a very bright 28, and has a good bit of throw for as small of a light as this is. The beam pattern isn’t all that it could be, though: a lot of artifacts and rings.

Streamlight Microstream in Hand

It helps that I like the UI. I prefer clickies generally; I find they are easier to operate with one hand. The Microstream’s clicky has a fairly tough plunger, and takes a bit more force than you would expect to switch on, but this is mitigated by a momentary-on feature that turns the Microstream on temporarily, for however long you keep the clicky semi-depressed. This is the way I use the Microstream most of the time, and I like it a lot.

Ergonomics and Carry

The ergonomics of the Microstream, like the light in general, are pleasingly adequate. Not totally stellar: the anodizing doesn’t afford quite as much traction as I would like, but it works. The ‘cigar grip’ puts your thumb comfortable over the clicky, and the Microstream’s length is such that holding it in your fist doesn’t occlude the light at all.

Streamlight Microstream Standing

The Microstream carries quite well. I don’t know how you guys like to roll, but clipped to the front of my pocket, the Microstream is easily accessible, doesn’t mess with my pocket knife, and doesn’t impede my hand when I go into my pocket for something else. Most pocket flashlights are too rotund for me to want to have them clipped to my pocket (I’m thinking of the HDS Rotary or the Olight S1 here), so they get carried loose, which is not ideal. The Microstream, with as small and slim as it is, carries just about perfectly clipped to my pocket.

If you prefer to carry your lights loose, however, I think you’ll find the Microstream to be a well-behaved passenger. It fits into a watch pocket if you want to keep it somewhere away from coins and other riff-raff.

Streamlight Microstream Spyderco Delica Size Comparison

Streamlight Microstream Review – Final Thoughts

There are a lot of areas in which the Microstream could be improved. That being said, I find it remarkable that in a world in which things like the S1 Baton or the L10C (or, my personal favorite, the Peak Eiger) exist, there is still merit in a product like the Microstream.

A lot of that merit comes from its agreeable price: while there are a lot of awesome lights to be had at the $30 – 50 range, there isn’t any light that I know of that costs as little as the Microstream, and that is as good. If there be such a thing as a ‘beater light,’ than the Microstream is it; it gets the job done, soaks up abuse, and doesn’t offend in any part of its design.

I know this is a hard sell for enthusiasts, but if you’re looking for something simple to tide you over between flashier (ha ha) purchases, the Microstream is worth a look. For somebody looking for a good first flashlight, something with dignity, but that isn’t prohibitively expensive, the Microstream should be on their shortlist.

I own strictly better flashlights than this and still like to carry the Microstream every once and while. It is simple, functional, and affordable, and I recommend it.

Streamlight 66318 MicroStream 45-Lumen Everyday Carry Pocket Flashlight with AAA Alkaline Battery, Black
  • Type II MIL-SPEC abrasion and corrosion-resistant anodized aircraft aluminum construction with unbreakable, scratch-resistant polycarbonate lens
  • Ultra compact design fits in the palm of your hand, comfortably fits in your pocket
  • Type II mil spec abrasion and corrosion resistant anodized aircraft aluminum construction with unbreakable, scratch resistant polycarbonate lens
  • Removable pocket clip also clips onto brim of hat for hands free use
$18.99 Amazon Prime
Buy on Amazon

I recommend buying the Streamight Microstream at Amazon.

Editor’s Note: Well, it only took 200 or so posts, but we have finally reviewed something besides a knife. I think it’s a nice change of pace, and Ben and I agreed that the Microstream is a good starting point for a library of flashlight reviews. Expect more flashlight reviews (and reviews of other pieces of gear) in the not so distant future.

Filed Under: Flashlight Reviews, Misc. Gear Tagged With: AAA

Spyderco Sharpmaker Review

by Dan Jackson 29 Comments

Last Updated: July 13, 2019
I occasionally get questions from readers about sharpening: what my “system” is, what products I recommend for sharpening, how I sharpen my knives, etc.

While I wouldn’t call myself a knife sharpening professional, I can certainly keep a blade sharp, and I have tried a number of different sharpening kits over the years.

Spyderco Sharpmaker
Buy the Spyderco Sharpmaker at BladeHQ

Buy on Amazon

Whenever I hand out recommendations for a sharpener, I always come back to the Spyderco Sharpmaker. It may not be the sexiest system, but it works. Some might be surprised to learn that before Spyderco sold knives, they sold knife sharpeners. The Sharpmaker is actually the first product Spyderco ever produced.

I’m not sure what these sold for back in the day, but today the Sharpmaker can be had for around $50. For $50 you really can’t beat it. It allows you to go from knowing nothing about sharpening knives to getting hair shaving, paper slicing edges in minutes. It almost sounds too good to be true, but I have experienced it first hand when I bought the Sharpmaker years ago. It was one of the first sharpening products I purchased, and I still have and use it to this day.

What You Get

The Sharpmaker is a very simple tool. Once you pry it free of its blister pack you are left with 4 ceramic sharpening rods (2 fine and 2 coarse), 2 brass guide rods, and a 2 part plastic base / case. I believe it also includes written instructions and a DVD, although these days everything is available online. All the components are well made and sturdy. I like how the entire package tucks into itself and forms its own little case. Very cool and easy to store.

Spyderco Sharpmaker Closed

Use

Using the Sharpmaker is pretty simple. If you can hold a knife perpendicular to the floor, then you can use the Sharpmaker. Basically, you put the base on a sturdy flat surface, put the rods into the base, hold your knife perpendicular to the floor, and run the edge of the knife up and down the rods. That’s all there is to it.

Once you get the basics down, you can play around with the nuances of the Sharpmaker. The rods come in 2 grits and you can place them in 2 settings: a 40 degree setting (20 degrees per side), which Spyderco advises for normal sharpening, and a 30 degree back bevel setting, which you can use to “relieve” the shoulders of the edge and make the edge a little more durable. You also don’t want to forget the brass guide rods. I’m sure general counsel for Spyderco wants me to mention that.

Spyderco Sharpmaker

The rods themselves are ceramic. The main things to watch out for with ceramic sharpening stones is to be careful not to drop them as they are brittle and can shatter, and that you will need periodically clean them with Ajax or a similar powdered abrasive cleaner. Ceramic is porous and you will see the rods fill up with tiny metal shavings. Once they fill up they must be cleaned out or the rods won’t work as efficiently. The good news is that the rods are triangular so you can rotate them around and get plenty of use in between cleanings. The other nice thing about triangular rods is that you can even sharpen recurved edges if you use the corners of the stones.

Generally I have been pretty happy with these ceramic stones. The only thing I noticed is that over time they seem to have developed little bumps or chips. Apparently they don’t do anything to mess up your edge, but I find it a little unnerving when I use the system and the blade catches one of the bumps.

Spyderco Sharpmaker

If you want to get really fancy you can order diamond and ultra fine rods for the Sharpmaker. The diamond rods are used to re-profile and aggressively remove steel. These diamond rods are good if you are trying to remove a chip or fix a really crummy edge, or maybe if you are working with a very difficult steel. The ultra fine rods can refine your edges even further for an even sharper knife. Personally, if the knife can cleanly cut paper and shave the hair off my arm, that’s as sharp as I need it. I can usually get that level of sharpness with just the regular stones that come with the Sharpmaker.

In addition to using the stones in the jigs, you can also use them as bench stones, and apparently you can use them to sharpen scissors. I free hand sharpen with the Sharpmaker stones all the time. I just hold the rod in one hand and sharpen with the other. That is the nice thing about the Sharpmaker system, you can use the guides to get a feel for how to sharpen, and then use it to learn how to freehand sharpen.

Spyderco Sharpmaker

Spyderco Sharpmaker Review – Final Thoughts

If you are new to the world of sharpening or are just looking for a simple kit that can take you from dull to sharp in minutes, I can safely recommend the Sharpmaker. It was one piece of equipment I purchased early on in my knife collecting career that I still use to this day. The system is near fool proof, the components are all high quality, and the price is right. For $50 you really can’t go wrong.

These also make great gifts, and are not just for hardcore knife enthusiasts. They are handy in the kitchen and are designed to be used by almost anyone. In our fast-paced single serve world maintaining what we have sometimes falls to the wayside – especially when we can just buy new cheap stuff. Learning how to keep your edged tools sharp is fun and empowering, and for that reason I think the Sharpmaker can be a very thoughtful gift.

In closing I cannot recommend the Sharpmaker more highly. It’s a versatile no-nonsense sharpening system that almost anyone can learn how to use.

Sale
Spyderco Tri-Angle Sharpmaker, Complete Knife Sharpening System with Medium Grit and Fine Ceramic Stones for Professional-Grade Finishing - Compact, Easy-to-Use Design - 204MF
  • Complete Sharpening System - Includes medium and fine grit ceramic stones for both edge maintenance and precision sharpening of knives and tools.
  • Versatile Performance - Perfect for sharpening knives, awls, scissors, and and many other tools, making it an all-in-one solution for your sharpening needs.
  • Effortless Sharpening - The Tri-Angle Sharpmaker makes sharpening easy, removing steel at the edge while maintaining consistent angles for precise results every time.
  • Two Grit Options - Comes with medium-grit (brown) ceramic stones for aggressive sharpening and fine-grit (white) stones for a professional-grade, polished finish.
  • Safe & Compact Design - Includes aluminum safety rods to protect your hands during use, and all components snap into the durable ABS plastic base for convenient storage. Complete with an instructional book and DVD for guided sharpening.
$87.00 Amazon Prime
Buy on Amazon

I recommend purchasing the Sharpmaker at Amazon or BladeHQ. Please consider that purchasing anything through any of the links on this website helps support BladeReviews.com, and keeps the site going. As always, any and all support is greatly appreciated. Thank you very much.

Filed Under: Misc. Gear, Sharpening and Maintenance Products, Spyderco

Rusty’s Rags Review

by Dan Jackson 12 Comments

Last Updated: August 30, 2019
For many people, when it comes to cleaning your knife it often comes down to what is available at the time. Whether you are using Q-tips and WD-40, soap and a dish towel, or perhaps the shirt on your back and some spit, knife nuts are opportunistic creatures when it comes to blade maintenance. Who would have thought that an improved option could ever exist? Latham of Rusty’s Rags recently approached me with his solution, a kit specially formulated for the care and maintenance of the edged implements we all know and love. I took him up on his offer to try them out and offer some opinions.

Rusty's Rags

Buy on Amazon

The ‘Ultimate Knife Care Kit’ by Rusty’s Rags

Firearms enthusiasts may be no stranger to Rusty’s Rags. In fact, the original application for these cleaning products was guns and their accessories. These days Rusty’s offers several different kits, including packages specifically designed for pistols and long guns. Everything in each kit is handmade in America. Of course, being BladeReviews.com I’m looking at their ‘Ultimate Knife Care Kit.’

At the heart of every kit is a piece of Australian Merino sheepskin. This sheepskin comes impregnated with their special blend of silicone oil. This oil is indeed a “secret blend of herbs and spices” passed down through the family. The mix of oil and wool is where the magic happens.

Included in every Knife Care Kit is the oil impregnated sheepskin, a soft flannel towel (in safety orange – nice), a pair of nitrile gloves, a small bottle of extra silicone oil, and some instructions. Everything comes nicely packaged in thick zip lock bags. The sheepskin comes rather “wet” so multiple bags is necessary to keep the oil from getting everywhere. The entire kit is about the size of my outstretched palm, and could easily be tucked away in a jacket pocket or gear bag.

Using the Kit

Using the kit is very simple. First you could don the gloves (totally optional, I didn’t). Then remove the sheepskin from the bag and rub your dirty knife down. You want to be careful to avoid getting the rag (more importantly, the silicone oil) in contact with your pivot. It could react with the lubricant used on your pivot and begin to gum it up. Of course, if this happens all you would need to do is take down the knife, clean off all the oil, and re-lubricate the pivot – it’s not like your knife is going to melt or anything. And for the record I never had an issue getting the silicon oil on the pivot.

Rusty's Rags

After thoroughly wiping down your knife with the rag you will want to switch to the flannel and begin polishing and soaking up any excess oil. Finally, you will want to put everything away and go wash your hands (assuming you didn’t use any gloves like me).

My Results

My first choice for the full treatment was my beloved Spyderco Sage 1. While I don’t make a habit of digging this blade around in the dirt, it does get a ton of carry time and was loaded down with grime in the liners and gunk on the blade.

I was really pleased with how well this knife polished up. The leather-backed sheepskin offers enough rigidity to make it easy to slip this rag in between the liners and clean out those hard to reach places. I find that regular rags and paper towels have a hard time getting at all of the dust and dirt that accumulates inside modern skeletonized liners. Rusty’s Rags gets into these tight spaces without an issue. Needless to say stuff like G10 and jimping were no match for the sheepskin and oil; everything cleaned up very easily.

Rusty's Rags with Knives

The finished knife is not sticky, and I didn’t see any lint or dust getting drawn to it (unlike WD-40 which is a dust magnet). The silicon oil is completely odorless. It leaves a nice shine and helps to prevent rust. My only issue with the kit was that the included flannel rag started fraying almost immediately. Oddly enough none of it got on the knife, but it did leave some nice orange specks my shirt.

Of course I couldn’t stop after one knife, and began thoroughly cleaning every blade within reach. Over the past few weeks I’ve used this kit on a dozen different knives and found the process to be fun and relaxing (almost therapeutic 😉 ). The pre-loaded rag was good for about a dozen or so cleanings, then I added a drop or two of oil per new knife. I would recommend opting for an extra bottle of the silicon oil. $5 buys enough oil to clean hundreds and hundreds of knives.

I’ve used this kit on everything from a $15 Ka-Bar to a $400 Umnumzaan. What do I think? I think it works, and it works well. Two big thumbs up for the Rusty’s Rags knife cleaning kit.

Rusty’s Rags Review – Final Thoughts

Rusty’s Rags offers a great solution to a common problem. This is a significant upgrade to my previous cleaning methods, which literally involved grabbing whatever was handy and using that to clean my knives.

The sheepskin and silicon oil combo has definite advantages – not only with cleaning, but with protecting as well. Paper towels and rags don’t get as deep as the sheepskin. More conventional cleaning oils attract dust, and cleaning with soap and water can invite rust. The combination of the sheepskin and silicon oil works much better than any of my old cleaning techniques.

Rustys Rags - Final Thoughts

So it should come as no surprised that I feel like this is a very worthy investment for anyone’s knife collection. In fact, I am so pleased with these kits that I will put my money where my mouth is, and order some more to use as gifts and future contest prizes.

Rusty's Rags New Rifle/Shotgun Gun Care and Gun Cleaning Kit
Buy on Amazon

You can find out more and order these directly by visiting the Rusty’s Rags website or at Amazon. Thanks for checkin’ out the review.

Disclaimer: Rusty’s Rags provided me with with several of these kits, free of charge, for review and evaluation. All thoughts are my own.

Filed Under: Made in the USA, Misc. Gear, Sharpening and Maintenance Products

  • « Go to Previous Page
  • Page 1
  • Page 2
  • Page 3
  • Page 4
  • Go to Next Page »

Primary Sidebar

Follow Us on FacebookFollow Us on TwitterFollow Us on YouTubeFollow Us on RSS

Subscribe to Email Updates and Never Miss a Review (No Spam)!

Enter your email address:

Delivered by FeedBurner

Shop BladeHQ

Shop Outdoor Gear on Amazon

Shop KniveShipFree.com

Search BladeReviews:

Best of BladeReviews:

Best EDC Knives
Best Survival Knives
Best Tactical Knives
Best High Value Knives

Copyright © 2025 · Log in