• Skip to primary navigation
  • Skip to main content
  • Skip to primary sidebar

BladeReviews.com

Knife Reviews

Menu
  • Home
  • Reviews by Brand
    • Al Mar Knives
    • Benchmade Knives
    • Boker Knives
    • Buck Knives
    • Cold Steel Knives
    • Chris Reeve Knives
    • CRKT Knives
    • DPx Gear
    • Emerson Knives
    • ESEE Knives
    • Fällkniven Knives
    • Fantoni Knives
    • Gerber Knives
    • Great Eastern Cutlery
    • Hinderer Knives
    • Hogue Knives
    • Ka-Bar Knives
    • Kershaw Knives
    • Kizer Knives
    • LionSteel Knives
    • Mcusta Knives
    • Mora Knives of Sweden
    • Microtech Knives
    • Ontario Knives
    • Opinel Knives
    • Reate Knives
    • Rockstead Knives
    • Schrade Knives
    • Shirogorov Knives
    • Smith & Wesson Knives
    • SOG Knives
    • Spartan Blades
    • Spyderco Knives
    • Steel Will Knives
    • Strider Knives
    • Victorinox Knives
    • Viper Knives
    • Zero Tolerance Knives
    • Close
  • Reviews by Purpose
    • EDC Knife Reviews
    • Tactical Knife Reviews
    • Survival Knife Reviews
    • Hard Use Folding Knives
    • High End Pocket Knives
    • Gentleman’s Folders
    • Rescue Knives
    • Traditional Knives
    • USA Made EDC Knives
    • Close
  • Reviews by Class
    • Folding Knives
    • Fixed Blade Knives
    • Assisted Opening Knives
    • Automatic Knives
    • Machetes
    • Titanium Frame Lock Knives
    • Close
  • Best Of
    • The Best EDC Knives
    • Best Survival Knives
    • Best Tactical Knives
    • Best High Value Knives
    • Close
  • Gear Reviews
    • Flashlight Reviews
    • Multi-Tool Reviews
    • Watch Reviews
    • Knife Sharpener Reviews
    • Close
  • FAQs
    • Knife Care and Maintenance
    • Knife Dictionary
    • Knife Steels
    • Steel Composition
    • Interviews
    • Close
  • Contact
  • About
    • About
    • Privacy
    • Links
    • Close

Sharpening and Maintenance Products

Work Sharp Ken Onion Edition (WSKTS-KO) Review

by Chad McBroom 9 Comments

Last Updated: July 29, 2019

Anyone who knows me knows I am passionate about keeping my blades sharp. I am constantly looking for the best tools and techniques for putting a killer edge on a piece of steel and maintaining that edge. I have used several different sharpening systems from table stones and rods to guided-angle sharpeners. The one type of sharpener I have always avoided, however, is the electric sharpener. I have seen the results of many pull-through electric sharpeners, and to say the least, they make me cringe. It’s kind of like sticking your blade inside a garbage disposal.

Work Sharp Ken Onion Edition

Buy on Amazon

After much reservation I finally decided to give a Work Sharp a try. I really wanted a system that would allow me to sharpen some of my larger blades, which includes some machetes, kukris, and tomahawks. After watching a contestant on the show Forged in Fire use a Work Sharp to do some finishing work on a cutlass, I decided it might be worth my time to give the system a test run. I chose to go with the Ken Onion Edition because of the additional features and attachment options not found on the standard model. Plus, I figured Ken Onion wouldn’t put his name on anything unless it was worthwhile.

What You Get

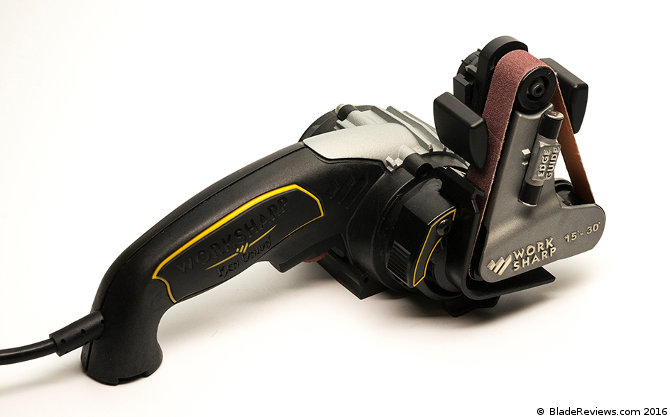
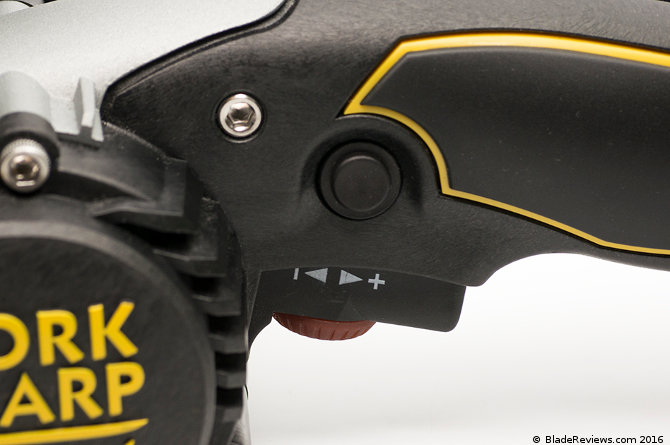
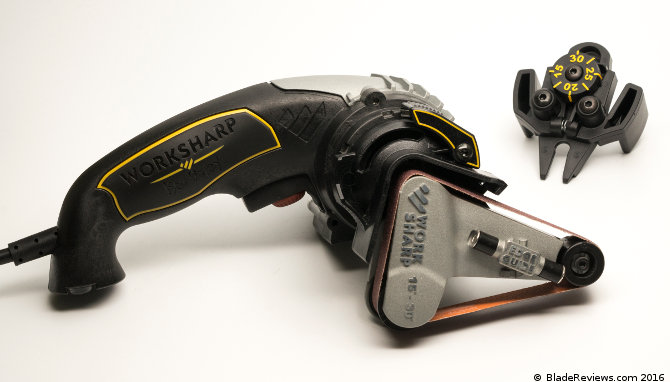
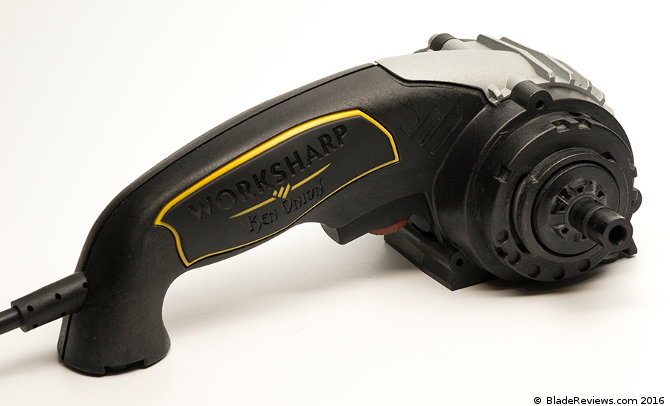
The Ken Onion Edition comes with the Work Sharp Ken Onion Power Platform equipped with a variable speed Power Switch, Power Switch Lockout, Sharpening Cassette with Edge Guide, removable Sharpening Guide with angle adjustment, and five abrasive belts (Extra Course, Coarse, Medium, Fine, and Extra Fine). The Ken Onion Edition also comes packaged with a detailed user’s guide and instructional DVD to guide you through the process of setting up and using your sharpener to the fullest, as well as a quick-reference card to hang in your shop.

Work Sharp Ken Onion Edition Edge Guide Close Up

Use

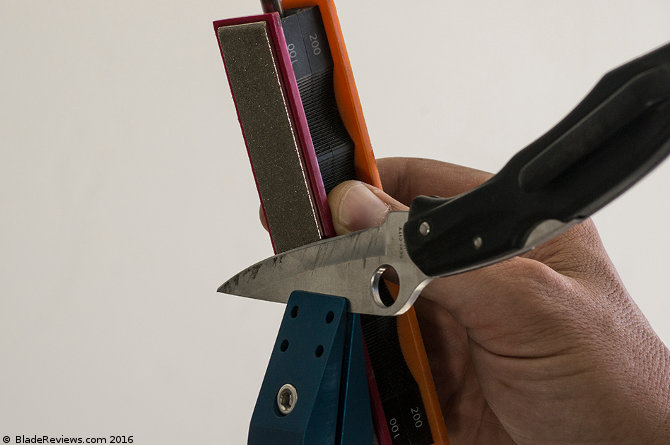
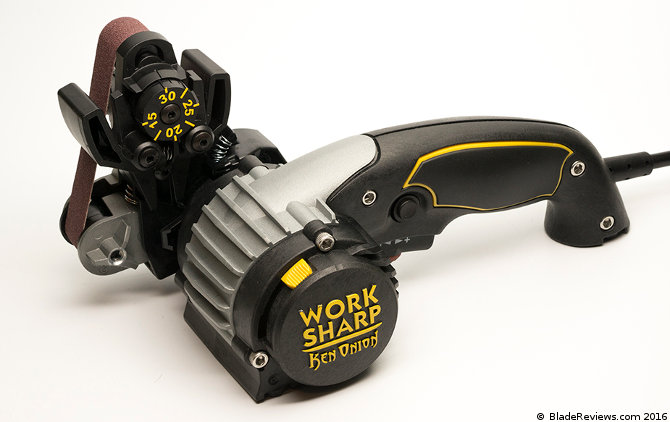
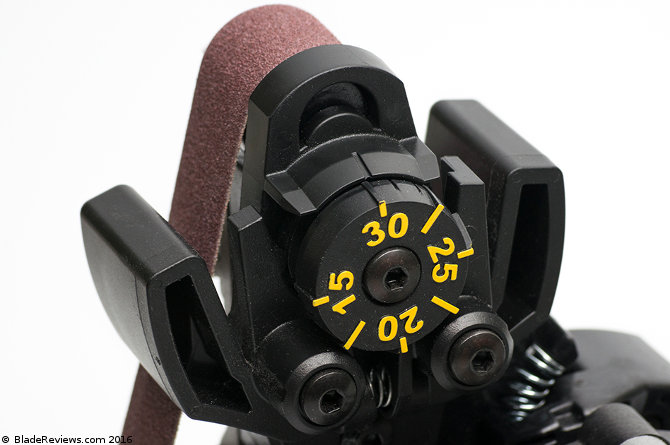
Setting up the Work Sharp for use is quick and easy. It is really just a matter of plugging the system in, choosing the appropriate abrasive belt, and selecting the sharpening angle. The belts can be easily swapped out by simply lifting the belt changing lever, sliding the belt on or off, and releasing the lever. The sharpening angle is set by turning the Angle Adjustment Knob located on the Sharpening Guide and aligning the desired angle with the indicator line at the top of the guide. The Angle Adjustment Knob is marked from 15 degrees to 30 degrees in 1-degree increments, offering a wide range of angle selections.

Work Sharp Ken Onion Edition

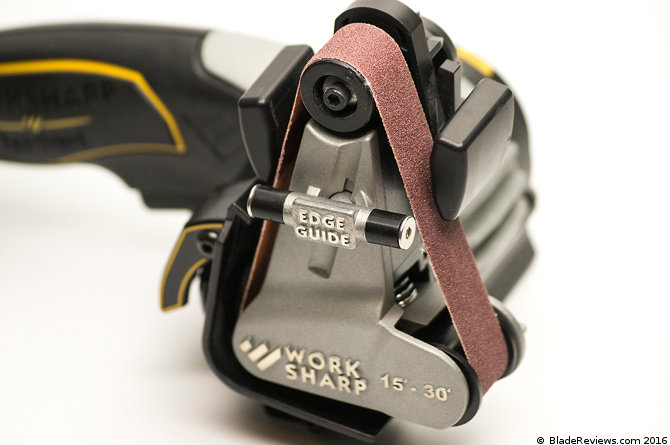
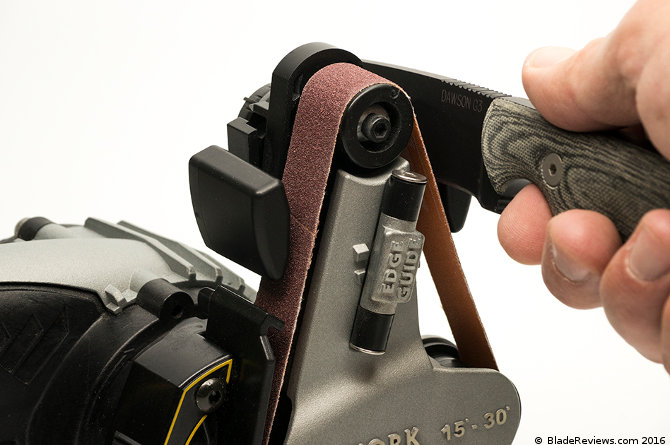
Once the angle is set and the desired belt installed, you are ready to begin sharpening. Beginning with the power off, insert the blade into the right side of the Sharpening Guide at the heel of the bevel. Squeeze the Power Switch and simultaneously pull the blade through the guide at a rate of one inch per second, following the curve of the blade and keeping the edge perpendicular to the belt. Be sure to use only the weight of the blade against the belt. Do not press down into the guide. Release the Power Switch and stop the pull when the tip of the blade reaches the center of the belt to avoid rounding the tip.

Work Sharp Ken Onion Edition Back Side

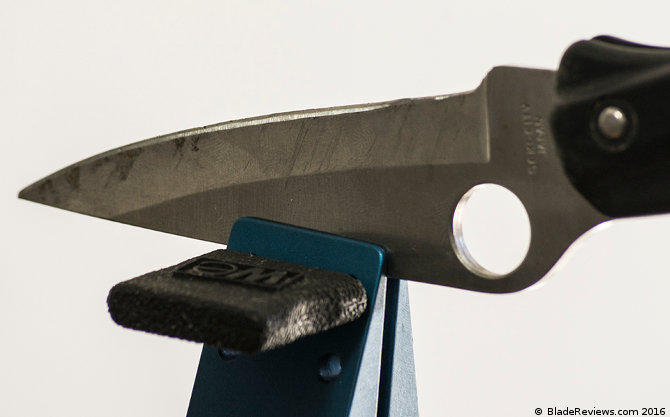
Repeat the process described here on the same side until you develop a burr, then repeat the same number of strokes on the other side. Once you have shaped the secondary bevel, you can progress with finer grit belts using alternating strokes. For longer blades such as kitchen knives, fillet knives, machetes, etc., the Edge Guide can be helpful to guide and support the blade during the sharpening process; however, for most field knives and pocket knives, the Edge Guide is not only unnecessary, but can actually get in the way.

Work Sharp Ken Onion Edition Angle Selection

The Work Sharp can also be used on serrated knives and gut hooks. Serrated knives are sharpened using the Extra-Fine belt at low speed against the non-beveled/flat side. Gut hooks can be sharpened by placing the curve of the hook over the Extra-Fine belt on the “downhill” side and honing for two to four seconds on each side. The WSKTS-KO can also be used to sharpen scissors using the built-in scissor guide. By removing the Sharpening Guide and rotating the cassette forward, the Work Sharp can be converted to grinding mode for sharpening lawnmower blades, axes, and other large blades.

Testing

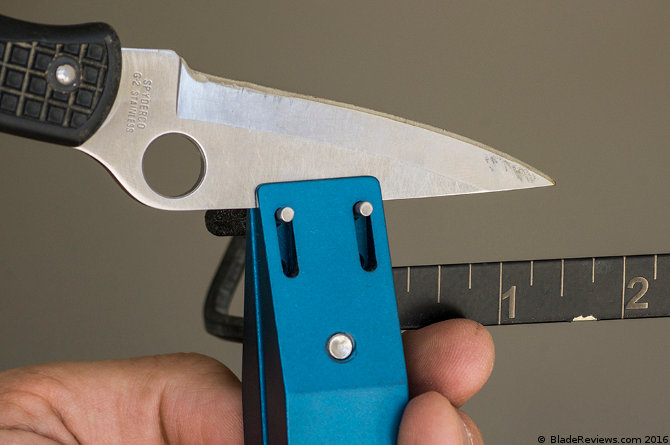
I tested a number of different blades out on the WSKTS-KO. I was quite hesitant at first to try the Work Sharp on any of my quality blades, so most of the blades were either severely damaged or much too large for some of the other sharpening systems I normally use. (I do recommend starting out with some lower quality or less sentimental knives until you get comfortable with the system.) I was quite impressed with how even and precise the bevel was after running the knives through the system. Don’t get me wrong, if you don’t use proper technique, you definitely risk over-grinding the bevel, but if you pull the blade through consistently in the manner I described above, you can achieve some very impressive results.

Work Sharp Ken Onion Edition Speed Selector

After getting comfortable with the system I sharpened every kitchen knife and utility knife in the house. The Work Sharp works so quickly it is amazing, especially when you are accustomed to doing everything by hand. I then converted the Work Sharp over to grinding mode and went to work on several tomahawks and axes. The system worked like a champ and left me with some very sharp choppers.

Work Sharp Ken Onion Edition in Use

Upgrades

As I mentioned earlier, the Ken Onion edition has some upgraded features that make it quite an attractive piece of equipment. There is a Tool Grinding Attachment that allows for both flat platen and slack belt grinding, and can be used as a power file or handheld belt sander for working with metal, wood, and plastics. The Blade Grinding Attachment will turn the WSKTS-KO into a miniature belt grinder capable of shaping, sharpening, and honing blades. There is also a nice selection of abrasive belts available for both the cassette and the Blade Grinding Attachment, including leather stropping belts.

Work Sharp Ken Onion Edition with Accessories

Work Sharp Ken Onion Edition (WSKTS-KO) Review — Final Thoughts

I was quite impressed with the WSKTS-KO, albeit to my surprise. I am still not a fan of electric sharpeners, but the Work Sharp really does not fall into that category as we know it. The Work Sharp is really a miniature grinder with the added benefit of an angle guide, and this makes all the difference. It definitely requires a certain amount of skill to use, which should not come as a surprise since this is true of any sharpening system, even the most rudimentary hand stone, but it is easy to learn and should not be feared.

Work Sharp Ken Onion Edition without Grinder Attachment

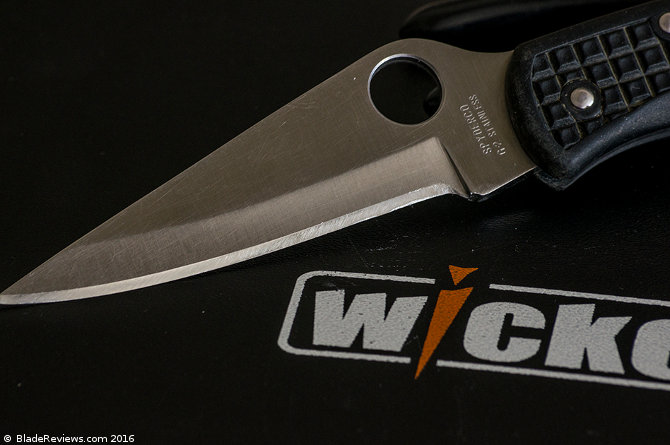
One thing I have not mentioned is the benefit of the convex edge. The very nature of the Work Sharp’s slack belt system results in a convex edge, which is an edge with a smooth radius void of any shoulders like a typical flat grind. The omission of the shoulders results in less friction during cutting and more supportive steel behind the edge. It has been my personal experience that a convex edge lasts longer and cuts cleaner than a flat-ground edge. In my opinion, the resultant convex edge gives the Work Sharp a leg up over many other systems.

If you are searching for a versatile, high-quality sharpening system, then the WSKTS-KO is an item at which you should take a hard look. The reasonable price tag makes this system even harder to pass up. I am not saying the WSKTS-KO is the end all be all, but it is definitely a great system with a ton of versatility. I have a feeling that I am only going to become more fond of this system over time. In the meantime, I think I need to get that Blade Grinder Attachment and see what I can do with it.

Work Sharp Knife & Tool Sharpener - Ken Onion Edition - Premium Knife Sharpening System - Serrated, Chef, Pocket Knives & Scissors
  • ADJUSTABLE SHARPENING GUIDE: Produces precise edge bevels from 15 to 30 degrees for that perfect sharpen for your knife or tool.
  • VARIABLE SPEED MOTOR: Handle every sharpening task, from grinding to honing. This sharpener has more power with improved cooling and the option of slow-speed honing or high-speed grinding.
  • FAST, PRECISE, & REPEATABLE: Deliver a strong, long-lasting razor-sharp convex edge with no setup or calibration time. The 6000 grit belt measures .5 x inches for better contact with serrations and other hard-to-reach edges.
  • 3-YEAR WARRANTY: All Work Sharp sharpeners come with a comprehensive 3-year warranty. Each knife & tool sharpener is meticulously designed and quality-checked at our Oregon facility. We proudly stand behind our products.
  • DESIGNED, ENGINEERED, & CALIBRATED IN OREGON: We design, engineer, and calibrate our sharpening machines all under one roof in Ashland, Oregon & ensure our products are sourced from the highest caliber manufacturers, both in the USA and globally.
Buy on Amazon

I recommend purchasing the Work Sharp Ken Onion Edition at Amazon or BladeHQ. Please consider that purchasing anything through any of the links on this website helps support BladeReviews.com, and keeps the site going. As always, any and all support is greatly appreciated. Thank you very much.

Filed Under: Made in the USA, Misc. Gear, Sharpening and Maintenance Products Tagged With: Ken Onion

Wicked Edge Field & Sport Review

by Chad McBroom 1 Comment

Last Updated: August 5, 2019
If you are a knife enthusiast, then you know the importance of keeping your blade sharp; however, this is not always an easy task. Unless you are highly skilled at maintaining a consistent angle and have a good understanding of the interaction between steel and stone, sharpening and honing your blade can become frustrating. I would venture to say that most knife owners would rather send their knife back to the factory or just buy a new knife altogether than try their hand at sharpening. Those of us that insist on doing it ourselves will typically spend hundreds of dollars trying to find a sharpening system that produces our desired results.

Wicked Edge Field and Sport Review
Buy the Wicked Edge Field & Sport at BladeHQ

Buy on Amazon

To make things easier for the common man, many companies have begun producing guided angle sharpeners to help people maintain a consistent angle while sharpening and honing. There are a number of these types of systems currently on the market, but those of you that follow my knife reviews here on BladeReviews.com and Black Sheep Warrior, know that I am a big fan of the Wicked Edge Precision Sharpener, which I use almost exclusively. I would have to say that the biggest downside of my Wicked Edge system is its lack of portability, which has forced me to rely on more compact systems like the Spyderco Sharpmaker for field use.

Well, I am happy to say that that has changed thanks to the the Wicked Edge Field & Sport.

What You Get

The Wicked Edge Field & Sport model is a portable version of the Wicked Edge Precision Sharpener with their Pro-Pack II hardware. The kit comes with a mounting vise, depth key, a variable angle degree bar, two guide arms with upgraded Pro Pack II ball joints and micro adjustable L-brackets, eight diamond sharpening stones (two of each in 100, 200, 400, and 600 grit), a mounting clamp, and a detailed instruction guide. All of these items fit conveniently into a light-weight carrying case with customized foam inserts so that every piece has its own little home.

Wicked Edge Field and Sport

Use

If you have never used a Wicked Edge system before, then it might be a bit intimidating at first. There is definitely a learning curve involved here, but the great thing about Wicked Edge is that they have a ton of resources on their website to help you learn how to run your system to its fullest potential. The Field & Sport works like any other Wicked Edge system when it comes to setting your angle and working the stones, but to give you the reader a good grasp on how this system works, I will walk through step by step from setup to finish.

Wicked Edge Field and Sport set up on a 2x4

You begin by mounting the sharpener to a hard, stable surface using the provided C-clamp mount. A work bench or picnic table is a good option. My work bench was too thick, so for testing purposes, I mounted the sharpener to a piece of 2×4 that I clamped into a bench vise. The sharpener should be mounted so that the numbers on the degree bar are right side up. The L-brackets of the guide rods are then attached to the degree bar with the ball joints facing inward towards the mounting vise.

Next, loosen the top screw of the vise enough that the knife you are going to sharpen will fit between the vise jaws. Insert the depth key from the left side into one of the sets of holes, using the top holes for smaller knives and the bottom holes for larger knives. Insert the blade into the vise with the tip facing away from you. The blade should be approximately centered from front to back and the spine should be setting against both prongs of the depth key.

Wicked Edge Field and Sport Ball Joint

One thing to note about the depth key is that the right side of the vise has elongated cutouts instead of the two sets of holes like the left side. When using the top setting, I have found that it is important to apply and maintain downward pressure on the left side of the key to get a consistent setting. Once the blade is positioned, tighten the top vise screw using the provided allen wrench, then tighten the bottom screw, being careful not to over tighten.

Now that the knife is mounted in the vise, it is time to set the sharpening angle. The easiest way to set your angle is to match the existing edge angle. Using the Sharpie technique is the easiest way to determine the bevel angle. Color the entire bevel on both sides using a Sharpie marker. Using a fine grit stone, lightly rub the edge to test the angle setting. The angle setting is correct when the marker is removed evenly from the entire bevel. If marker is removed from the top, but not the bottom, then the angle is too wide. If it is removed from the bottom, but not the top, then the angle is too narrow.

Wicked Edge Field and Sport Sharpening a Knife

The next step is finding the “sweet spot,” which is where the knife needs to be position in the clamp to get a consistent bevel throughout the the length of the blade. This can be done using the Sharpie technique again. If marker is removed from the edge at the heel and the shoulder at the tip, then the knife is too far forward in the vise. If marker is removed from the shoulder at the heel and the edge at the tip, then the knife is too far back. The knife is correctly positioned when marker is removed parallel to the edge and shoulder along the entire length of the blade.

Once your angles are set and you have located the sweet spot, then you can begin sharpening. There are several techniques you can use with the stones, but for the new user the best method is to start at the heel and slide the stone up and away along the entire bevel so that the stroke is completed when the bottom of the stone reaches the tip of the knife. Work from coarse to finer grits until reaching the desired level of sharpness.

Wicked Edge Field and Sport  Sharpened Spyderco

Testing

For the purpose of this review, I sharpened an old Spyderco Endura that I have had for years. When I originally purchased this knife, it had a fully serrated edge, but after years of hard use those serrations became quite worn down and damaged to the point where I eventually removed them. The knife never really had a decent edge on it after that, though.

Wicked Edge Field and Sport with a blade in the vise

I went to work on it with the Field & Sport and within about 20 minutes, I had a nice, razor-sharp bevel that would slice through paper with ease. There was one spot on the shoulder that I had to touch up after taking the photo shown here. This was the result of going too deep with a grinder in one spot when removing the serrations, which caused this section of the bevel to be off from the rest. Fixing it required a little more elbow grease and the use of my 50 grit diamond stones to remove quite a bit more steel. Not something you would normally have to deal with when sharpening a knife.

Wicked Edge Field and Sport - Sharpened Knife

Upgrades

The Field & Sport comes with the basic stones needed to put a good working edge on your knife. Of course, if you want to re-profile a blade or hone the bevel to a beautiful, hair-splitting mirrored finish, then you will want to invest in some additional stones. Wicked Edge offers everything from 50 grit diamond stones to ceramics. They even have several specialty stones such as Japanese water stones and offer an array of leather strops and stropping compounds.

Wicked Edge Field and Sport Case

Wicked Edge Field & Sport Review — Final Thoughts

If you are looking for a high-grade, portable, angle-guided sharpener, or perhaps you have been considering the Wicked Edge Precision Sharpener but have been hesitant to fork over several hundred dollars on a knife sharpener, then the Wicked Edge Field & Sport is an excellent option. You get all the benefits of the Wicked Edge in a more economical and portable package. Of course, I can’t recommend the Wicked Edge enough as it is. It is, in my opinion, the epitome of knife sharpeners.

In closing, I would like to thank the guys at Wicked Edge for the opportunity to demo this awesome product of theirs. If you love your steel the way I do, then do yourself a favor and get one of Wicked Edge’s awesome sharpening systems. The Field & Sport is a great place to start!

Wicked Edge Field and Sport - WE200
Buy on Amazon

I recommend purchasing the Wicked Edge Field & Sport at Amazon or BladeHQ.

Filed Under: Misc. Gear, Sharpening and Maintenance Products

Spyderco Sharpmaker Review

by Dan Jackson 29 Comments

Last Updated: July 13, 2019
I occasionally get questions from readers about sharpening: what my “system” is, what products I recommend for sharpening, how I sharpen my knives, etc.

While I wouldn’t call myself a knife sharpening professional, I can certainly keep a blade sharp, and I have tried a number of different sharpening kits over the years.

Spyderco Sharpmaker
Buy the Spyderco Sharpmaker at BladeHQ

Buy on Amazon

Whenever I hand out recommendations for a sharpener, I always come back to the Spyderco Sharpmaker. It may not be the sexiest system, but it works. Some might be surprised to learn that before Spyderco sold knives, they sold knife sharpeners. The Sharpmaker is actually the first product Spyderco ever produced.

I’m not sure what these sold for back in the day, but today the Sharpmaker can be had for around $50. For $50 you really can’t beat it. It allows you to go from knowing nothing about sharpening knives to getting hair shaving, paper slicing edges in minutes. It almost sounds too good to be true, but I have experienced it first hand when I bought the Sharpmaker years ago. It was one of the first sharpening products I purchased, and I still have and use it to this day.

What You Get

The Sharpmaker is a very simple tool. Once you pry it free of its blister pack you are left with 4 ceramic sharpening rods (2 fine and 2 coarse), 2 brass guide rods, and a 2 part plastic base / case. I believe it also includes written instructions and a DVD, although these days everything is available online. All the components are well made and sturdy. I like how the entire package tucks into itself and forms its own little case. Very cool and easy to store.

Spyderco Sharpmaker Closed

Use

Using the Sharpmaker is pretty simple. If you can hold a knife perpendicular to the floor, then you can use the Sharpmaker. Basically, you put the base on a sturdy flat surface, put the rods into the base, hold your knife perpendicular to the floor, and run the edge of the knife up and down the rods. That’s all there is to it.

Once you get the basics down, you can play around with the nuances of the Sharpmaker. The rods come in 2 grits and you can place them in 2 settings: a 40 degree setting (20 degrees per side), which Spyderco advises for normal sharpening, and a 30 degree back bevel setting, which you can use to “relieve” the shoulders of the edge and make the edge a little more durable. You also don’t want to forget the brass guide rods. I’m sure general counsel for Spyderco wants me to mention that.

Spyderco Sharpmaker

The rods themselves are ceramic. The main things to watch out for with ceramic sharpening stones is to be careful not to drop them as they are brittle and can shatter, and that you will need periodically clean them with Ajax or a similar powdered abrasive cleaner. Ceramic is porous and you will see the rods fill up with tiny metal shavings. Once they fill up they must be cleaned out or the rods won’t work as efficiently. The good news is that the rods are triangular so you can rotate them around and get plenty of use in between cleanings. The other nice thing about triangular rods is that you can even sharpen recurved edges if you use the corners of the stones.

Generally I have been pretty happy with these ceramic stones. The only thing I noticed is that over time they seem to have developed little bumps or chips. Apparently they don’t do anything to mess up your edge, but I find it a little unnerving when I use the system and the blade catches one of the bumps.

Spyderco Sharpmaker

If you want to get really fancy you can order diamond and ultra fine rods for the Sharpmaker. The diamond rods are used to re-profile and aggressively remove steel. These diamond rods are good if you are trying to remove a chip or fix a really crummy edge, or maybe if you are working with a very difficult steel. The ultra fine rods can refine your edges even further for an even sharper knife. Personally, if the knife can cleanly cut paper and shave the hair off my arm, that’s as sharp as I need it. I can usually get that level of sharpness with just the regular stones that come with the Sharpmaker.

In addition to using the stones in the jigs, you can also use them as bench stones, and apparently you can use them to sharpen scissors. I free hand sharpen with the Sharpmaker stones all the time. I just hold the rod in one hand and sharpen with the other. That is the nice thing about the Sharpmaker system, you can use the guides to get a feel for how to sharpen, and then use it to learn how to freehand sharpen.

Spyderco Sharpmaker

Spyderco Sharpmaker Review – Final Thoughts

If you are new to the world of sharpening or are just looking for a simple kit that can take you from dull to sharp in minutes, I can safely recommend the Sharpmaker. It was one piece of equipment I purchased early on in my knife collecting career that I still use to this day. The system is near fool proof, the components are all high quality, and the price is right. For $50 you really can’t go wrong.

These also make great gifts, and are not just for hardcore knife enthusiasts. They are handy in the kitchen and are designed to be used by almost anyone. In our fast-paced single serve world maintaining what we have sometimes falls to the wayside – especially when we can just buy new cheap stuff. Learning how to keep your edged tools sharp is fun and empowering, and for that reason I think the Sharpmaker can be a very thoughtful gift.

In closing I cannot recommend the Sharpmaker more highly. It’s a versatile no-nonsense sharpening system that almost anyone can learn how to use.

Spyderco Tri-Angle Sharpmaker, Complete Knife Sharpening System with Medium Grit and Fine Ceramic Stones for Professional-Grade Finishing - Compact, Easy-to-Use Design - 204MF
  • Complete Sharpening System - Includes medium and fine grit ceramic stones for both edge maintenance and precision sharpening of knives and tools.
  • Versatile Performance - Perfect for sharpening knives, awls, scissors, and and many other tools, making it an all-in-one solution for your sharpening needs.
  • Effortless Sharpening - The Tri-Angle Sharpmaker makes sharpening easy, removing steel at the edge while maintaining consistent angles for precise results every time.
  • Two Grit Options - Comes with medium-grit (brown) ceramic stones for aggressive sharpening and fine-grit (white) stones for a professional-grade, polished finish.
  • Safe & Compact Design - Includes aluminum safety rods to protect your hands during use, and all components snap into the durable ABS plastic base for convenient storage. Complete with an instructional book and DVD for guided sharpening.
Amazon Prime
Buy on Amazon

I recommend purchasing the Sharpmaker at Amazon or BladeHQ. Please consider that purchasing anything through any of the links on this website helps support BladeReviews.com, and keeps the site going. As always, any and all support is greatly appreciated. Thank you very much.

Filed Under: Misc. Gear, Sharpening and Maintenance Products, Spyderco

3 Easy Knife Sharpening Tips

by Dan Jackson 4 Comments

Last Updated: August 12, 2019
In this post I’ll be covering three easy tips to help you sharpen your knives. Lets face it, sharpening can be a challenge, especially if you are getting into freehand sharpening. These tips are great for the beginner to intermediate sharpener that is trying to get their sharpening game to the next level.

I mainly use these tips when I am freehand sharpening, but they work just as well for sharpening systems like the Sharpmaker and Lansky systems. Perhaps the best part about these tips is that you can put them into action immediately, and they won’t cost you a dime.

1. Use a Marker

This tip is pretty straightforward. Grab a marker and “paint” the edge of your knife before you start to sharpen it. The goal is to work the marker off your knife evenly during sharpening. A mistake a lot of people make when they first get into freehand sharpening is that they raise or lower the blade as they perform a sharpening stroke. When you do that you typically fail to sharpen the entire length of the edge. The marker trick makes it easy to confirm that you are sharpening the entire length of the edge, and also lets you know are holding the knife at the right angle as well.

Applying marker to a knife edge

This is is a great tip if you have temporarily lost your sharpening “mojo” or just want more feedback when sharpening your knife. In my opinion one of the biggest challenges to freehand sharpening is the lack of feedback – obviously you know whether the knife got sharp or not, but it can be hard to see exactly what is going on. The marker trick provides valuable feedback and ensures you are sharpening your entire edge.

2. Use a Lubricant

We already know that lube makes everything better, so it should come as no surprise that applying a lubricant to your sharpening stone will improve the sharpening experience as well. I typically use water and dish soap, or oil (WD-40 is fine) as my primary sharpening lubricants, and I’ve had good success with both. But don’t start slathering your stones in the slick stuff just yet – determine the right lubricant for your stone first. I’ve gone ahead and broken it down for you:

  • Japanese Water Stones – Don’t use any lubricant. Just add water.
  • Ceramic Stones – Water and a little dish soap
  • Diamond Stones – Water and soap, or oil
  • Arkansas Stones – Oil

Sometimes a lubricant can be messy and more trouble than it’s worth, but with stubborn steels going the extra mile and adding a lubricant first can really help you achieve better results. I find using a lubricant typically leaves a nicer finish on the edge as well.

3. Film Yourself Sharpening

This final tip is kind of geeky, but it’s one of my favorites and can really improve your sharpening skills. The tip is to film yourself sharpening. Much in the same way golfers film their swing to improve their drive, you can get better edges by recording a video of yourself and learning from the footage. I happen to film videos for YouTube so this was an easy one for me, but you don’t have to be Steven Spielburg to harness the power of film. Use a camcorder if you have one, or just rig your cell phone up to capture some footage. Break out the popcorn, enjoy the show, and prepare get a whole new perspective on your sharpening technique.

Film Yourself Sharpening

I like this tip a lot, and find that I learn something new almost every time I review my own sharpening footage. If you are really feeling frisky, upload the footage to YouTube for others to critique.

Final Thoughts

There you go, 3 easy ways to take your sharpening skills to the next level. These are tips I use myself and have generally had great success with them. Let me know what you think, and feel free to add your own tips and tricks in the comments section below.

For even more tips, check out KnifePlanet.net’s article on 55 sharpening tips.

Filed Under: Sharpening and Maintenance Products

5 Knife Maintenance Tools That Every Knife Owner Needs

by Dan Jackson 48 Comments

I recently received an excellent question from a reader. He was new to collecting knives, and had his eye on a very nice Benchmade as his first “real” pocket knife. He had some concerns though. He didn’t know what extra “stuff” he needed to maintain his knives, and he wasn’t sure if he would need a sharpener of some sort. This is an excellent question, and I am sure other people are wondering the same thing. So I decided to write this post to cover the topic.

Top 5 Knife Maintenance Tools

With that said, I really don’t think the average person needs a whole a lot of stuff to maintain their knives. In fact, I’m sure many knife owners have lived long and happy lives without any of the products I am about to mention. But if you are getting into modern knives, and are investing in a high quality blade (or ten 😉 ), then I do suggest picking up few basic tools and supplies. This will help you get the most out of your purchase, and ensure that your knives are always in pristine working condition.

So here are 5 things that I both recommend and use myself. The entire list can be had for around $75, and that is with $50 going to a knife sharpener – and yes, I definitely think you need a knife sharpener!!

1. A sharpening system.

If I could only recommend one thing to someone new to knives, it would have to be a sharpener. The other stuff on the list is nice to have, but really, you could probably survive a little while without them. However, knives tend to get dull fast, and depending on the steel (and what you do with it), that factory edge will probably need it’s first touch up anywhere from 1-4 weeks from purchase. So my point is, don’t put off buying a sharpener. It’s like buying a car and never changing the oil – bad stuff will happen!

Spyderco Sharpmaker

Now, there are a lot of options out there, but for the beginner I really just recommend starting with a [easyazon_link identifier=”B000Q9C4AE” locale=”US” tag=”brdfkdfk-20″]Spyderco Sharpmaker[/easyazon_link]. It costs $50, but you will be able to get paper slicing, hair shaving edges with very little time or practice. It is an amazing sharpening system and a great starting point. It feels great to be able to get a nice sharp edge on any knife, and the Sharpmaker delivers that feeling fast. If you want you can read my Spyderco Sharpmaker review.

[easyazon_infoblock align=”center” identifier=”B000Q9C4AE” locale=”US” tag=”brdfkdfk-20″]

There are other cheaper systems in the $20-30 range, but really – I recommend spending the extra $20 or whatever and just getting the Sharpmaker. And whatever you do, please don’t subject your knives to one of those cheap $5 pull-style sharpeners! Those are terrible for your edges!

Update – if you are looking for an option that is less expensive than the Sharpmaker, then my good friend RoadKill recommends the $16 [easyazon_link identifier=”B000B8FW0E” locale=”US” tag=”brdfkdfk-20″]Lansky Crock Sticks[/easyazon_link]. His word is good enough for me, although I will try and get my hands on a set for a future review. These are actually very similar to the Sharpmaker in theory. I don’t doubt that they are quite effective.

2. A Torx Driver Set.

The next thing I recommend is some sort of a torx driver set to to adjust all the little screws on a knife. This is critical for swapping pocket clips, adjusting your pivots, and taking apart knives for deep cleaning.

Wiha 85992 Bit Set Closed Case

I used to recommend the cheap little sets you can buy at the big box hardware stores for under $10. But these feature soft bits, that can damage the screws on your expensive knives, so I’ve since upgraded to WiHa drivers. They are expensive, but will last a lifetime.

[easyazon_infoblock align=”center” identifier=”B0000WTBO4″ locale=”US” tag=”brdfkdfk-20″]

I happen to own their Wiha 75992 set, but they make a wide variety of styles and kits.

3. Loctite.

A small bottle of blue Loctite is another nice to have item, especially if you are removing screws and adjusting your pivots with a torx driver set. With some knives I find that the pivots easily work loose and blade play starts to develop. A small dab of blue (“removable”) Locktite on your pivot will fix that problem. This stuff is also handy for those pesky pocket clip screws that like to work loose.

The nice thing is, you probably already have some Loctite in your garage. Just make sure it’s the removable kind so if you happen to get some on a moving part, you can still work it free.

[easyazon_infoblock align=”center” identifier=”B000I1RSNS” locale=”US” tag=”brdfkdfk-20″]

4. Tuf-Glide.

If you are like me, and are constantly flicking your pocket knives open, you are going to want a little lubricant to keep everything silky smooth. Although there are a wide variety of lubricants out there, I recommend Tuf-Glide. I like Tuf-Glide because it is a high quality dry lubricant that doesn’t attract dust or dirt.

[easyazon_infoblock align=”center” identifier=”B000Q82HSY” locale=”US” tag=”brdfkdfk-20″]

Sure, WD-40 and other lubricants will work, but they tend to attract dust, dirt, gunk, and grime. Also, they don’t tend to last as long. For those reasons I feel that Tuf-Glide is a superior lubricant and is well worth purchasing. A bottle of Tuf-Glide will set you back around $10 shipped if you buy it online, but it should last you a long time. I’ve used the same bottle for almost a decade.

5. Rusty’s Rags.

Rusty’s Rags is the name of a nice little cleaning kit for knives (and guns). I wouldn’t call Tuf-Glide or Rusty’s rags to be absolutely critical (you could certainly survive with out them), but this kind of stuff sure is nice to have.

Again, you could use something else to clean your blades – like WD-40 and a cloth, but I really like the way Rusty’s Rags work. I also like how the oil used in the kits is 100% food safe. I actually wrote a full review on Rusty’s Rags a while back so if you want more information you can read my Rusty’s Rags review here.

Final Thoughts

With these 5 basic items you should be able to maintain your knives on a day to day basis. Odds are, you probably already have some of this stuff, and the sharpener will be your biggest investment. By the way, I do see this kind of stuff as an investment. Spending the money now to take care of your knives will ensure that you get the most out of all your knives for many many years.

If you have any questions or suggestions, feel free to let me know in the comments section below. Thanks for reading and stay sharp.

Filed Under: Sharpening and Maintenance Products

Rusty’s Rags Review

by Dan Jackson 12 Comments

Last Updated: August 30, 2019
For many people, when it comes to cleaning your knife it often comes down to what is available at the time. Whether you are using Q-tips and WD-40, soap and a dish towel, or perhaps the shirt on your back and some spit, knife nuts are opportunistic creatures when it comes to blade maintenance. Who would have thought that an improved option could ever exist? Latham of Rusty’s Rags recently approached me with his solution, a kit specially formulated for the care and maintenance of the edged implements we all know and love. I took him up on his offer to try them out and offer some opinions.

Rusty's Rags

Buy on Amazon

The ‘Ultimate Knife Care Kit’ by Rusty’s Rags

Firearms enthusiasts may be no stranger to Rusty’s Rags. In fact, the original application for these cleaning products was guns and their accessories. These days Rusty’s offers several different kits, including packages specifically designed for pistols and long guns. Everything in each kit is handmade in America. Of course, being BladeReviews.com I’m looking at their ‘Ultimate Knife Care Kit.’

At the heart of every kit is a piece of Australian Merino sheepskin. This sheepskin comes impregnated with their special blend of silicone oil. This oil is indeed a “secret blend of herbs and spices” passed down through the family. The mix of oil and wool is where the magic happens.

Included in every Knife Care Kit is the oil impregnated sheepskin, a soft flannel towel (in safety orange – nice), a pair of nitrile gloves, a small bottle of extra silicone oil, and some instructions. Everything comes nicely packaged in thick zip lock bags. The sheepskin comes rather “wet” so multiple bags is necessary to keep the oil from getting everywhere. The entire kit is about the size of my outstretched palm, and could easily be tucked away in a jacket pocket or gear bag.

Using the Kit

Using the kit is very simple. First you could don the gloves (totally optional, I didn’t). Then remove the sheepskin from the bag and rub your dirty knife down. You want to be careful to avoid getting the rag (more importantly, the silicone oil) in contact with your pivot. It could react with the lubricant used on your pivot and begin to gum it up. Of course, if this happens all you would need to do is take down the knife, clean off all the oil, and re-lubricate the pivot – it’s not like your knife is going to melt or anything. And for the record I never had an issue getting the silicon oil on the pivot.

Rusty's Rags

After thoroughly wiping down your knife with the rag you will want to switch to the flannel and begin polishing and soaking up any excess oil. Finally, you will want to put everything away and go wash your hands (assuming you didn’t use any gloves like me).

My Results

My first choice for the full treatment was my beloved Spyderco Sage 1. While I don’t make a habit of digging this blade around in the dirt, it does get a ton of carry time and was loaded down with grime in the liners and gunk on the blade.

I was really pleased with how well this knife polished up. The leather-backed sheepskin offers enough rigidity to make it easy to slip this rag in between the liners and clean out those hard to reach places. I find that regular rags and paper towels have a hard time getting at all of the dust and dirt that accumulates inside modern skeletonized liners. Rusty’s Rags gets into these tight spaces without an issue. Needless to say stuff like G10 and jimping were no match for the sheepskin and oil; everything cleaned up very easily.

Rusty's Rags with Knives

The finished knife is not sticky, and I didn’t see any lint or dust getting drawn to it (unlike WD-40 which is a dust magnet). The silicon oil is completely odorless. It leaves a nice shine and helps to prevent rust. My only issue with the kit was that the included flannel rag started fraying almost immediately. Oddly enough none of it got on the knife, but it did leave some nice orange specks my shirt.

Of course I couldn’t stop after one knife, and began thoroughly cleaning every blade within reach. Over the past few weeks I’ve used this kit on a dozen different knives and found the process to be fun and relaxing (almost therapeutic 😉 ). The pre-loaded rag was good for about a dozen or so cleanings, then I added a drop or two of oil per new knife. I would recommend opting for an extra bottle of the silicon oil. $5 buys enough oil to clean hundreds and hundreds of knives.

I’ve used this kit on everything from a $15 Ka-Bar to a $400 Umnumzaan. What do I think? I think it works, and it works well. Two big thumbs up for the Rusty’s Rags knife cleaning kit.

Rusty’s Rags Review – Final Thoughts

Rusty’s Rags offers a great solution to a common problem. This is a significant upgrade to my previous cleaning methods, which literally involved grabbing whatever was handy and using that to clean my knives.

The sheepskin and silicon oil combo has definite advantages – not only with cleaning, but with protecting as well. Paper towels and rags don’t get as deep as the sheepskin. More conventional cleaning oils attract dust, and cleaning with soap and water can invite rust. The combination of the sheepskin and silicon oil works much better than any of my old cleaning techniques.

Rustys Rags - Final Thoughts

So it should come as no surprised that I feel like this is a very worthy investment for anyone’s knife collection. In fact, I am so pleased with these kits that I will put my money where my mouth is, and order some more to use as gifts and future contest prizes.

Rusty's Rags New Rifle/Shotgun Gun Care and Gun Cleaning Kit
Buy on Amazon

You can find out more and order these directly by visiting the Rusty’s Rags website or at Amazon. Thanks for checkin’ out the review.

Disclaimer: Rusty’s Rags provided me with with several of these kits, free of charge, for review and evaluation. All thoughts are my own.

Filed Under: Made in the USA, Misc. Gear, Sharpening and Maintenance Products

  • « Go to Previous Page
  • Page 1
  • Page 2

Primary Sidebar

Follow Us on FacebookFollow Us on TwitterFollow Us on YouTubeFollow Us on RSS

Subscribe to Email Updates and Never Miss a Review (No Spam)!

Enter your email address:

Delivered by FeedBurner

Shop BladeHQ

Shop Outdoor Gear on Amazon

Shop KniveShipFree.com

Search BladeReviews:

Best of BladeReviews:

Best EDC Knives
Best Survival Knives
Best Tactical Knives
Best High Value Knives

Copyright © 2025 · Log in