This post contains affiliate links. We may get paid an affiliate commission if you buy something or take an action after clicking one of the links on this web page.
This post came out of a desire to solve my own problem. I have some Oster Fast Feed hair clippers, and the blades became dull after a while. I spent $50+ on these clippers, so I wasn’t about to throw them away. They sell replacement blades, but at almost $20 they seemed awful expensive. I wanted to figure out how to sharpen the existing blades.
After spending half an hour combing through the dregs of YouTube and Google I had yet to find a simple, no B.S. article on how to sharpen hair clippers written by someone who actually knew what they were talking about. Plenty of shill sites were willing to serenade you with articles barely written in English, and plenty of people on YouTube were willing to fumble around for 10-20 minutes trying to explain this simple process. Neither of those experiences left me feeling good.
Eventually I was able to figure it out, and I wanted to pay it forward by putting together this quick guide.
So I apologize to my regular readers if this is outside our normal programming, but the article does involve sharpening things, and Japanese water stones, so it sort of fits the theme of the site. Maybe you will find it useful or mildly entertaining. And don’t worry, I won’t be reviewing hair clippers any time soon…
Without further adieu, I present my no-nonsense guide to sharpening hair clippers:
What You Will Need
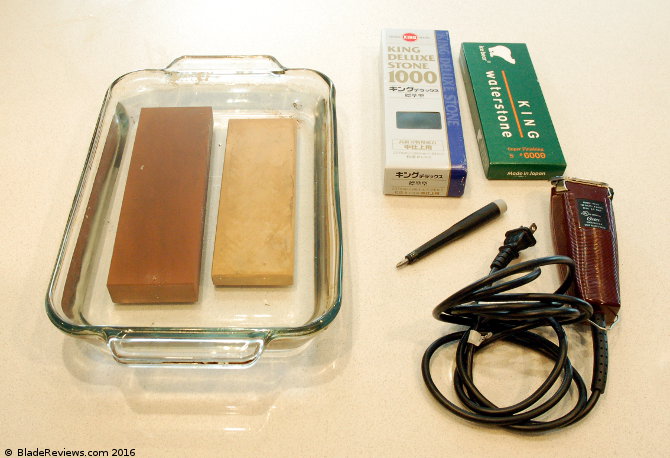
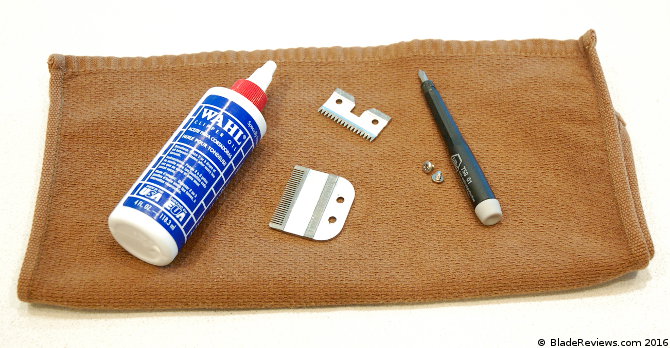
You won’t need much to sharpen your clippers. Here’s a bulleted list so you don’t forget anything:
- Some Dull Hair Clippers; (In this article I sharpen a set of Oster Fast Feed clippers.)
- A Phillips Screw Driver;
- A Cleaning Brush;
- A Bench Stone; (I use King Whetstones, but any set will do.)
- Clipper Oil; and
- A Rag.
The most important piece of equipment will be your sharpening stone. I used Japanese water stones, because those are the bench stones I have, but you could easily substitute in a diamond stone or Arkansas stone. Heck, you may even be able to use super fine wet sandpaper.
I will say that the water stones work great for this. I have a set of King 1000 grit and 6000 grit stones and they are perfect for the job. If you use water stones like I did, you obviously need to soak them before you start. If you have a diamond or Arkansas stone you may want to hit them up with a little lubricant before starting.
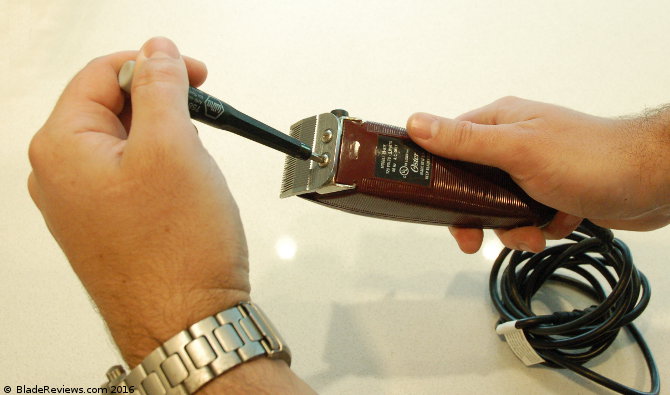
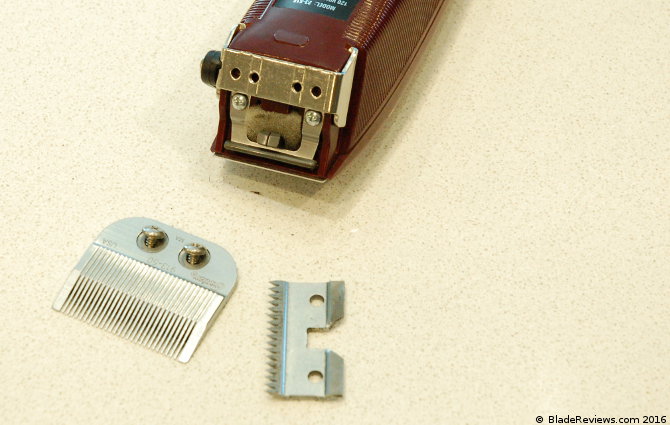
Disassemble Your Clippers
Now that you have everything you need to get the job done, carefully take your clippers apart with a Phillips screw driver. There are 2 blades to a set of clippers, so pull those both off and clean them. Now would also be a great time to clean out your clippers with a brush.
Sharpen the Blades
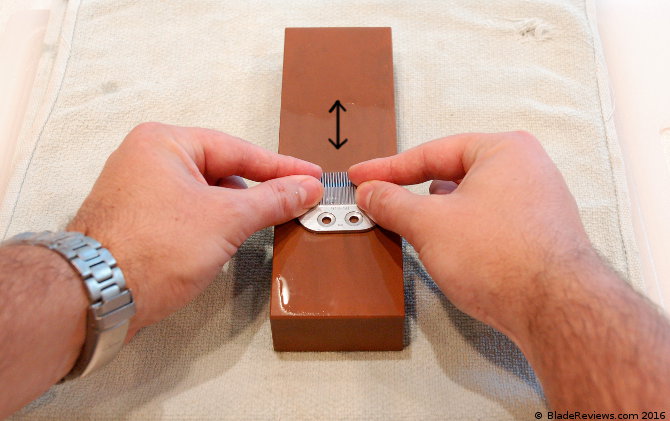
You will want to sharpen the flats of both the top and bottom blade. This is easy to do, and is much easier than sharpening a knife. The arrows in this picture point to the flats I am talking about:
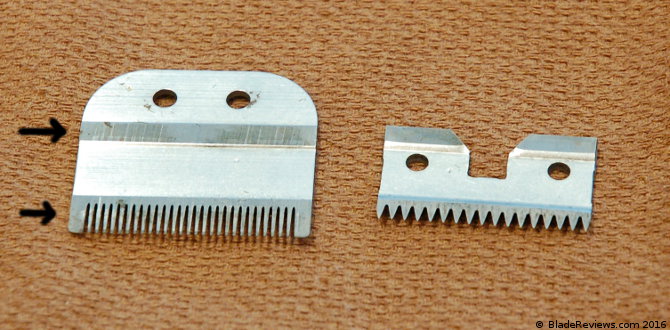
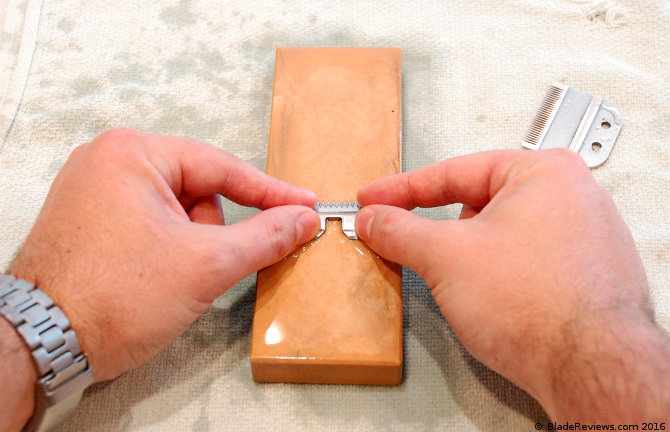
The trick is to lay the blade flat on the stone, and run the blades back and forth along the stone with gentle pressure. It should not take much to sharpen your blades. I would suggest 10 passes along the stone.
Make sure you keep the flats of the blades flat on the stone. The only way to screw this up is if you don’t keep the blades flat. Some people use a magnet as a handle. That’s a next level clipper sharpening move. I’m not that sophisticated. Thankfully if you don’t have a special magnet your thumbs and index fingers will work fine.
I sharpened my blades on my 1000 grit stone, and then polished them on the 6000 grit stone because I had it handy. I don’t think you need a super fine stone to get a decent result, but it doesn’t hurt.
It should take only a minute or 2 to sharpen the blades. I ended up taking 5 minutes because I was trying to snap some pictures while I sharpened. The actual sharpening is super easy.
Clean and Oil the Blades
Once you have sharpened your blades you will want to clean and oil them prior to reassembly. I used a little soap and water to clean my blades, but rubbing alcohol wouldn’t hurt. I then oiled my blades down to prevent rust, and blotted away the excess oil.
Reassemble Your Clippers
This is probably the trickiest part of the process. When you reassemble your clippers you will want to take the time to make sure you have the blades lined up properly. The blades are sharp so be careful.
I don’t tighten the blades down all the way until I am sure I have everything adjusted the way I want. Once you have your blades dialed in add a drop of oil to the blades, and then fire up your clippers before you start cutting hair to make sure everything was put back together properly.
Sharpening Hair Clippers – Final Thoughts
Cutting hair with dull clipper blades is no fun. They don’t cut cleanly, and will sometimes pull hair. It’s just like trying to use a dull knife. I use my clippers once a week or so, and end up sharpening about once a year. I’d be curious to hear how often professional barbers sharpen their clippers.
I hope this article helps some people. Don’t be intimidated by this if you are new to sharpening things. Sharpening clippers is easy to do and you will immediately be able to tell the difference after sharpening.
A good bench stone will make a big difference here. You want something that won’t move while you are trying to sharpen, and a stone that is wide enough to accommodate your clippers. If you don’t already have a good bench stone, I’d recommend the investment. The King stones I used in this article are inexpensive, and they will last most people a lifetime. Plus, if you learn how to freehand sharpen you can also use the stones for your kitchen and pocket knives.
Good job. I had the same problem and experience recently trying to sharpen the blades on my pet trimmers. Ultimately sent them out for service because I couldn’t find a clear explanation of all parts that needed to be sharpened. This helps tremendously.
Thank you, Reed. I am very glad to hear this article was helpful. It has been sitting in my “drafts” folder since 2016.
Dan
Great information. I will try it. Thanks
Very nice. I think I have the same Oster clippers. Mine are about 17 yrs old, and I sharpen them every few years, but I only use them once a month or so.
Thank you, Mark!
Dan
Come to think of it hair clipper reviews wouldn’t be too out of place for a website called bladereviews…
Careful what you wish for…
Don’t forget to use a scale to ensure you have the proper tension on the blades after they are assembled. Set the blade to 3-4 lbs before the blade begins to move across the comb. This can be done on a kitchen scale or a fish scale.
Thank you for this. I have two long hair dogs to trim and after a few uses my clippers started pulling more than trimming. So…. hopefully now I can trim and not pull!!!
Becky,
I am glad this article has proven to be useful! Sharpening clipper blades isn’t that hard if you have a decent whetstone. Cheers!
Dan
thanks for the info! according to this page: http://coolmenshair.com/2011/10/sharpen-hair-clipper-blades.html the blades will sharpen themselves if you clean them and run them for 5 mins. Any thoughts on this?
Fredo, It’s worth a shot, but I keep my clippers cleaned and oiled and they eventually go dull requiring me to sharpen the blades as I’ve described.
Best,
Dan
I’m a bit confused…..in the paragraph “Sharpen the Blades”….you have a pic of both blades with arrows showing where to sharpen……one arrow is showing the back of the blade by the screw holes?? Don’t you just sharpen the cutting edges of both blades? Oil or no oil on the whetstone? Thanks
Hi Nancy,
You want to sharpen both parts of the blade, otherwise it won’t work. Hard for me to explain in writing, but both of those flat pieces need to be kept at the same thickness, and if you only sharpen one of those flat parts you are going to ultimately going to throw things off balance and eventually the clippers won’t cut right.
Regarding the oil question: It depends on the kind of sharpening stone you use. I used a waterstone, so for that kind of stone you definitely don’t use water. If you are using an Arkansas stone or something else that requires oil then by all means use oil.
Dan
Where do I buy the stone ? Great article. Can’t wait to try it.
ThAnk you !
Connie, I use King water stones. Here is a link to a basic set that will work fine for clippers.
Dan
Excellent article. I have some Oster and Andis T-84 wide clipper blades that I use on a horse and dog. The blades stop cutting and were pulling the hair. I used the above method with the fine side of a DMT diamond sharpening stone which is perfectly flat. Now the blades cut hair like a hot knife through butter. Thanks for the sharpening tip!
Paul, Thanks for taking the time out to leave a comment. I am happy you found the article to helpful!
Dan
Your article is easy to understand and to the point. I groom my own 4 poodles so I really wanted to sharpen my own blades.
I purchased a set of Norton Waterstones, 200/1000, 4000/8000. I sharpened exactly like your directions say to do. None of my 4 blades will cut hair now. I saw a video saying to sharpen them side to side so I tried that and it helped but no where near good enough to get the job done.
Now I’m thinking I better just buy 4 new blades till I can find out what I need to do to make these blades cut hair again. Very frustrated.
Hi Cynthia,
I am sorry this method did not work for you. Were these stainless steel clipper blades? They won’t work on ceramics. Yes, you can also sharpen side to side, and some people even swirl the blades around in a circle. I find the back and forth method works best for me.
And at some point after multiple sharpenings the clipper blades wear down to the point where they will no longer work. At that point you have to replace the blades. But I was able to sharpen my clipper blades several times before they wore down to the point where they no longer made contact and cut properly. I find it doesn’t take much to sharpen them. I probably was a little overzealous when I first started and sharpened away more metal than I needed to. Best to start with a light touch.
Dan
Dan,
Can you explain why stainless steel will not work on ceramic stones?
Dean, I should clarify my comment to say that these sharpening instructions will not work for ceramic clipper blades, and this guide is only for sharpening steel clipper blades only. If you want to sharpen clipper blades made of ceramic you probably need to consult with a professional of some sort.
You can use a ceramic sharpening stone to sharpen steel clipper blades no problem. Sorry for any confusion.
Dan
Hey guys and gals, please don’t look any further to sharpen any blades using sandpaper WHEN YOU CUT ANIMAL HAIR!!! The difference between human hair and animal hair is HUGE! Animal hair is much thinner. If you don’t have a convex sharpening wheel, you’re screwed. If you like to check the blades, take a rabbit fur and do your thing on it and you’ll see that your blades won’t cut, and your pet will be very angry. Send your blades to a professional service if you want to cut animal hair or human.
i need good stone to sharp blade
I recommend a couple in the article. If you are new to sharpening any basic stone will do. I used some water stones in the example, but ceramic, Arkansas, or diamond stones will all work.
Dan
Cynthia, assuming you have the type of blade that completely removes from the clipper as a set like for an Oster A5, following sharpening, you need to make sure that there’s proper tension on the bottom blade and that the bottom blade is properly aligned with the top blade. There are various videos on YouTube explaining how to set the tension and the alignment, both are easy to do. Thanks.
Oh thank you! I’m gonna do this as I’m a grooming with for kids and sharpening our blades every few months gets pretty darn spendy for someone who has mouths to feed
What are the clippers supposed to sound like?
Kurtis,
Good question. They should be relatively quiet and not buzz loudly or click.
Dan
Wonderful site and well written. I do have one problem though – of course. When you said “. When you reassemble your clippers you will want to take the time to make sure you have the blades lined up properly. ” What exactly does ‘properly’ look like. Once the blades are apart (I’m using Andis) it’s hard to recall exactly where the cutting blade should be positioned to get the best cut. I am sure they are parallel to the top piece but how far up should they be? Andis leave lots of room for adjusting in all directions.
I too have had an experience where I followed someone’s directions and dulled up every blade I had. This time I’m only trying 2 -#10s and 1 #4. My #4 and #7 for show on Cocker Spaniels won’t cut worth a darn even when they were new. I have my female Cocker 1/2 clipped and my last #10 went dull to where it’s not comfortable for her. I won’t do that to a dog.
Again, thanks for all the information you shared. There are some sites out there where groomers are almost brutal with handling a dog while showing you how to trim. When done the dog’s coat looks like it was chewed on by a pack of rats. I won’t mention ‘My Favorite Groomers’ site for examples of how not to groom dogs but you can figure it out, I’m sure. 😉
Thanks again,
Chutz
Hi Chutz,
Yes, I mean the blades need to be parallel to each other. You can adjust the other directions to your preference and I don’t think it matters.
Dan
Thanks Dan! One more silly question. When replacing the blade and holder after a thorough cleaning, I’m never sure how far ‘north and south’ to adjust them. I’ve tried matching the teeth so they make a continuous looking line North to South. (I sure hope this makes sense) If this sounds nuts since it’s getting late here, I can take a picture or send a drawing if it would help. I get times when I put the cutter back in and if it’s not adjusted just right it quits cutter – just won’t go. These are Cocker Spaniels so they can get a wooly undercoat but the blade shouldn’t quit just because I’ve cleaned it and put it back together. I’ve fought this problem for, ummm, more years than I care to share but it’s over 35 and then some more. I should maybe change breeds since cockers can be a chore to keep up but that’s not going to happen. Have you ever help an American Cocker Spaniel puppy or an adult and looked into those eyes, stroked their long, silky ears, OK, I’ll quit.Obviously it’s past bed time. One dog’s to my left, the other to my right waiting to get some sleep too.
Thanks again for having such a nice site.
Chutz
Finally someone who understands the frustration of sharpening blades. It is too costly to send out two times a year or more. Thank you so much.
Knife Sharpening Stone Whetstone Knife Sharpener 400/1000 Grit Water Stone Kit Double Sides Wetstone
I purchased this one a while ago and used. My blades are worst, I set them to the side hesitating to send out. Did i ruin them or is there some hope that I can salvage them. Did I use the right stone?
Thanks again for your help
Can’t emphasize enough that you must have flat stones for clipper sharpening to work. The slightest deviation will leave some teeth cutting and others not cutting. Very fine diamond lapping plates are perfectly flat and last a long time. Pricey, but they remove one variable when sharpening. Not all wet stones (oil or water) come perfectly flat – you get what you pay for – so some sort of lapping plate for wet stones is pretty essential.
Hey John, Thanks for the tip. That’s a good point! I was wondering if a professional knife sharpener would ever comment on the review, and I’m glad you did!
Dan
There are only a couple of blogs on sharpening clipper blades properly, and yours is one of the best. Straightforward, accurate, and easy to read. Great job!
Thank you!
Interesting, Thankyou . What would you recommend brand wise? Im in Aus! And obviously not in the business so need to keep cost down. Any decent less expensive diamond ones?
Very clear,entertaining and educative information. can this stones be used for sharpening business?
Niyi, Thank you. I’m not a professional sharpener. Not sure what the pros use. But these stones will sharpen a lot of stuff.
Dan
Dan,
In your illustrations, the black arrows seem to point to the angled/sloped part of the blade. But since you refer to sharpening the “ flats”… I’m going to keep the blades flat as I sharpen the non-sloping side of each blade. Correct?
Thx,
Brad
Brad,
That’s correct. You don’t sharpen the sloping side. You sharpen the flat side where the blades contact each other. Good luck!
Dan
Thanks. I’d previously watched a utube vid that showed this, although he used a round stone and a circular motion. But your no nonsense blog gives a bit more clout to the proper way to do it. And I like your humour.
Off to get my wet stone. Thanks
Hi,
I just got some stones to sharpen Andis T-84 blades. They don’t feel any different than before I “sharpened” them. Somewhere in the article you say “they will be sharp” when handling (before reassembling in clipper). Not sharp feeling at all to me. The stones also got black marks from the blades going back and forth. What about these 2 issues? Oh, and no air bubbles ever came out of the stones after leaving them in the water 15+ minutes. Thank you.
What sort of stones did you buy? Japanese water stones?
I have never been successful to sharpen blades in this manner. They simply wont cut Wire Hair terrier hair.
The only way is to hollow ground the blades on a honing wheel like the pros do
Professional sharpeners working on “A5” detachable blades will sharpen the clipper blades (most of them) with a machine that leaves a very slight hollow (concave) grind where only the teeth tips and edges on the comb blade and cutter blade are in contact (relatively small surface area contact). Flat honing (done correctly) can accomplish this but generates more heat (larger-flatter surface area) and might necessitate heavier spring (that funny shaped piece that holds the smaller cutting blade against the comb blade) tension to avoid having hair get between the blades (rather than cut by the blades) if they are not precisely done, again, creating more heat. The cutting blade should be adjusted so the tips of the teeth are set back slightly from the tips of the comb blade (while being parallel) this is so as not to harm the animal but also aids in cutting. There are some videos on YouTube as to how to adjust spring tension but try to get blade geometry done properly first. Keep your blades clean and properly oiled.
Hi Even after sharpening my blades i thoroughly clean them put them back together and find they still seem blunt or not cutting like new blades would i use 150 grit and 220 grit paper on a flat surface i double the amount of passes with the fine grit what am i doing wrong ?
Good and simple instructions, Dan. I have an Oster A2 pet clipper that I bought in 1970, used it every three to four months on every dog that we’ve had since then. The older Oster blades were dependably sharp out of the box; not so much anymore. I also have a newer Andis clipper that is much quieter, and a smaller Wahl for tight places. I spend about 15 minutes sharpening a variety of blades – #4FC, #7, #10, #30 – on #1000 and #6000 whetstones once a year . Does the trick and mirrors your instructions. Glad I ran across your posting on Google search.
GREAT INFO. IT REALLY MADE A NIGHT AND DAY DIFFRENCE IN MY CLIPPERS…CHEERS